How to Use Linode Object Storage
Updated , by Linode Community
Traducciones al EspañolEstamos traduciendo nuestros guías y tutoriales al Español. Es posible que usted esté viendo una traducción generada automáticamente. Estamos trabajando con traductores profesionales para verificar las traducciones de nuestro sitio web. Este proyecto es un trabajo en curso.
NoteLinode Object Storage is now available to the general public in the Newark, Frankfurt, and Singapore data centers! For billing information on Object Storage, see our Object Storage Pricing and Limitations guide.
CautionObject Storage is similar to a subscription service. Once enabled, you will be billed at the flat rate regardless of whether or not there are active buckets on your account. You must Cancel Object Storage to stop billing for this service.
Linode’s Object Storage is a globally-available, S3-compatible method for storing and accessing data. Object Storage differs from traditional hierarchical data storage (as in a Linode’s disk) and Block Storage Volumes. Under Object Storage, files (also called objects) are stored in flat data structures (referred to as buckets) alongside their own rich metadata.
Additionally, Object Storage does not require the use of a Linode. Instead, Object Storage gives each object a unique URL with which you can access the data. An object can be publicly accessible, or you can set it to be private and only visible to you. This makes Object Storage great for sharing and storing unstructured data like images, documents, archives, streaming media assets, and file backups, and the amount of data you store can range from small collections of files up to massive libraries of information. Lastly, Linode Object Storage has the built-in ability to host a static site.
In this guide you learn about:
How to get set-up for object storage by creating an Object Storage Key Pair.
The variety of first-party and third-party tools available to access and use the service.
How to connect to Object Storage, how to upload and access objects, and how to host a static site using:
Enable Object Storage
Object Storage is not enabled for a Linode account by default. All that is required to enable Object Storage is to create a bucket or an Object Storage access key. To cancel Object Storage, see the Cancel Object Storage how-to.
NoteBilling for Object Storage starts when it is enabled on the account, regardless of how it is enabled. For example, if you enable the service by creating an access key, but you have not yet created a bucket, the $5 monthly flat rate (prorated) for Object Storage is charged for the account. Cancelling Object Storage stops billing for it.
Object Storage Key Pair
The first step towards using Object Storage is to create a pair of keys for the service. This pair is composed of an access key and a secret key:
The access key allows you to access any objects that you set to have private read permissions.
Note
To use the access key when viewing a private object, you first need to generate a signed URL for the object. The signed URL is much like the standard URL for the object, but some extra URL parameters are appended to it, including the access key. Instructions for generating a signed URL can be found for s3cmd and the Linode CLI, outlined in this guide.The secret key is used together with the access key to authenticate the various Object Storage tools with the Linode account. You should not share the secret key.
Note
Each Object Storage key pair on the Linode account has complete access to all of the buckets on the account.
Generate a Key Pair
You need a pair of keys to use Object Storage: an access key and a secret key. You can generate them from the Cloud Manager by following these steps:
Log into the Linode Cloud Manager.
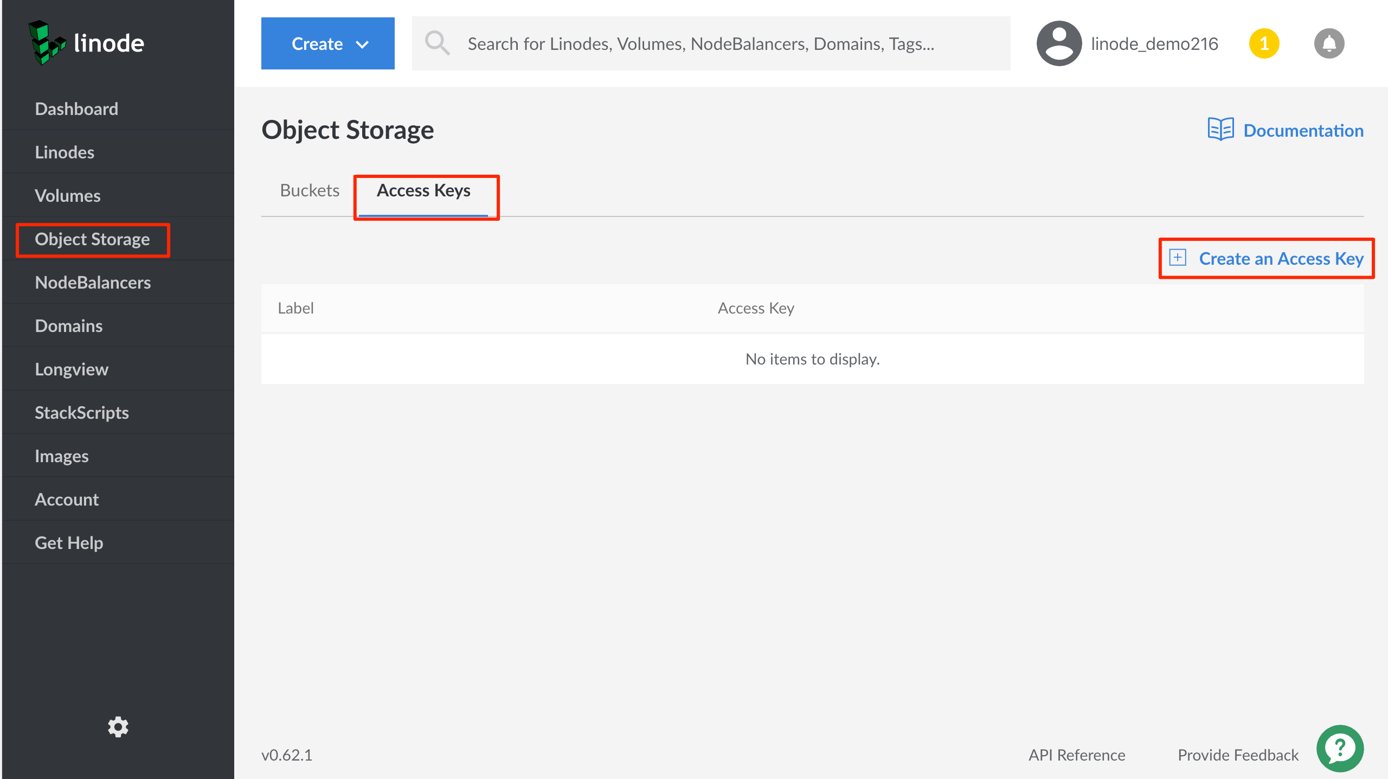
Click the Object Storage link in the sidebar, click the Access Keys tab, and then click the Create an Access Key link.
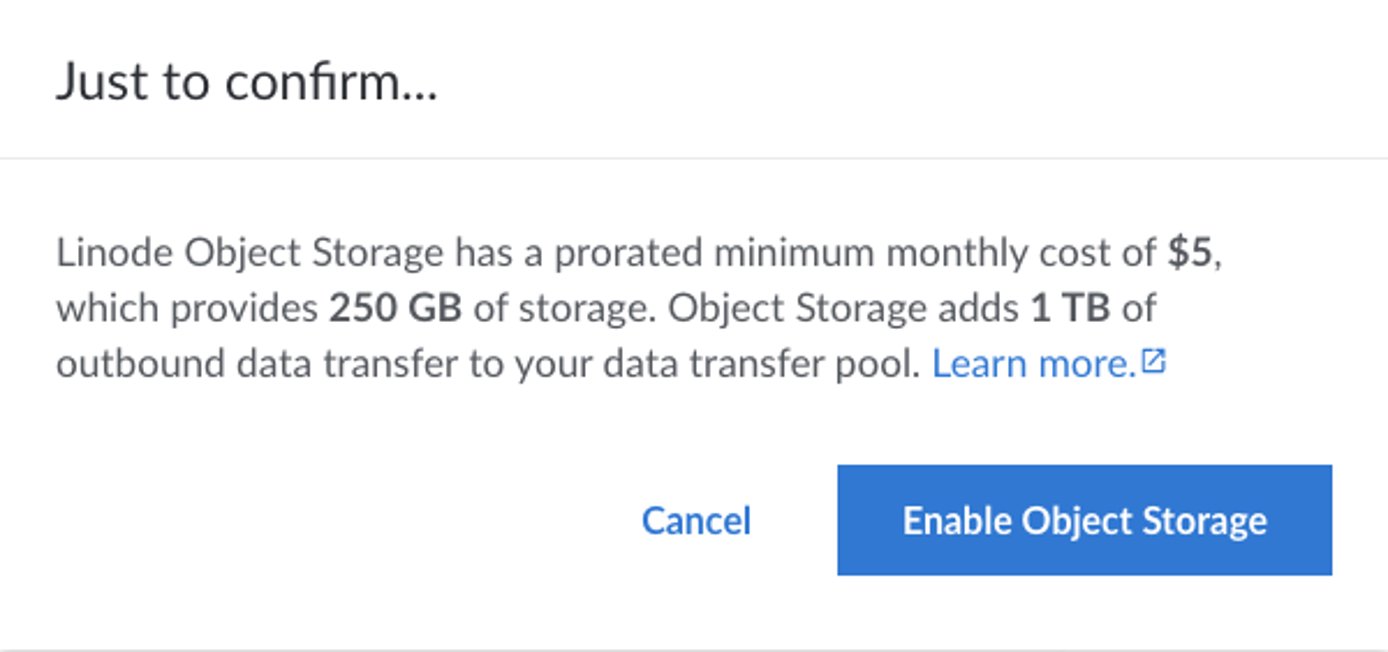
If this is your first bucket and you have not enabled Object Storage previously, a prompt appears asking you to confirm that you’d like to enable Object Storage. Click Enable Object Storage.
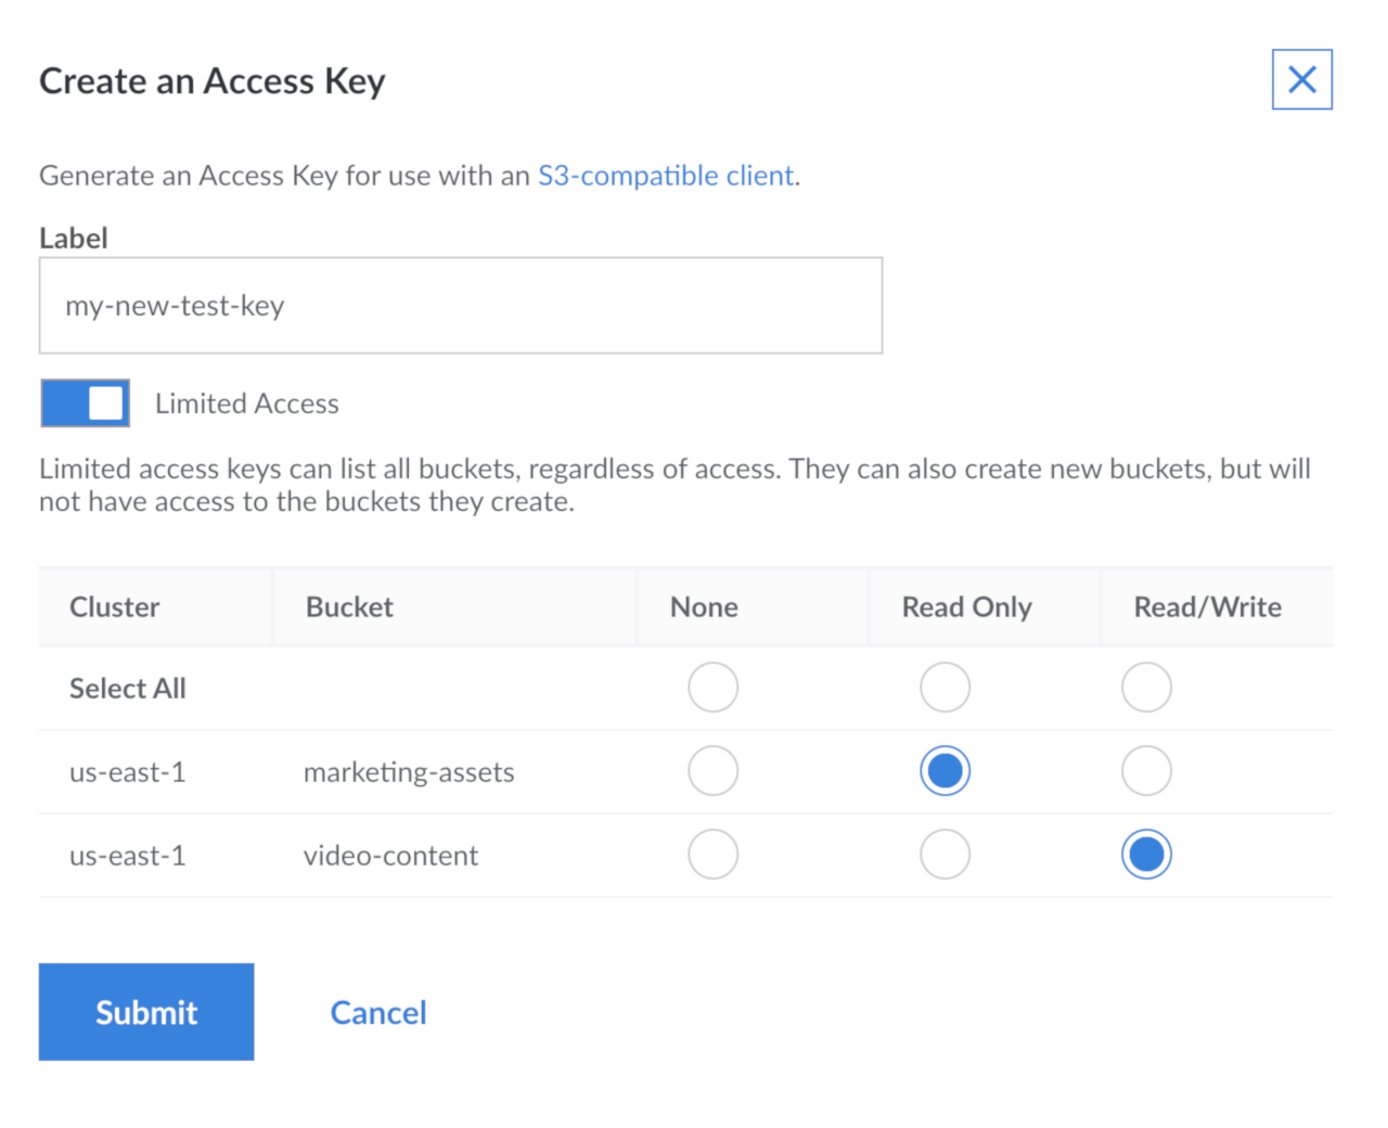
The Create an Access Key menu appears.
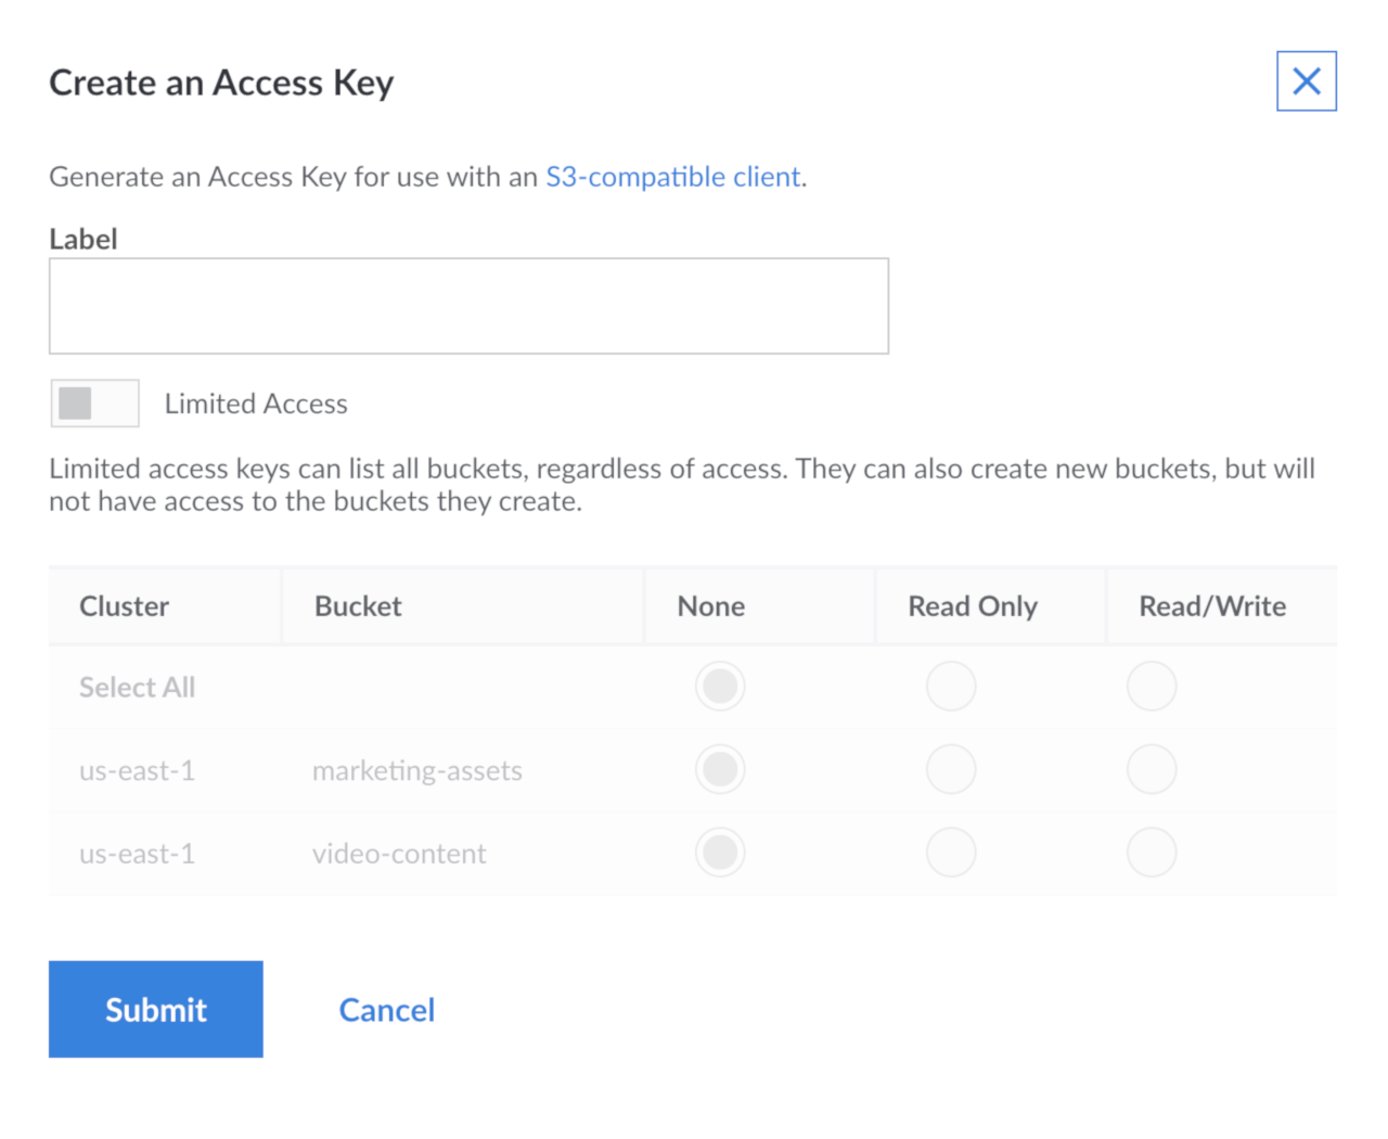
Enter a label for the key pair.
This label is how you reference the key pair in the Linode Cloud Manager.
You can also toggle the Limited Access switch on this panel. This allows you to limit certain permissions on a per bucket level for this access key.
Note
Regardless of access, all keys can create new buckets and list all buckets. However, after creating a bucket, depending on what you select here, a limited access key may not be able to access those buckets, add items, remove items, and other actions.
When you have entered the Label, and optionally selected the desired permissions, click the Submit button.
A window appears displaying the Access Key and the Secret Key. Write these down somewhere secure. The access key is visible in the Linode Cloud Manager, but you can not retrieve the secret key again after you close the window!
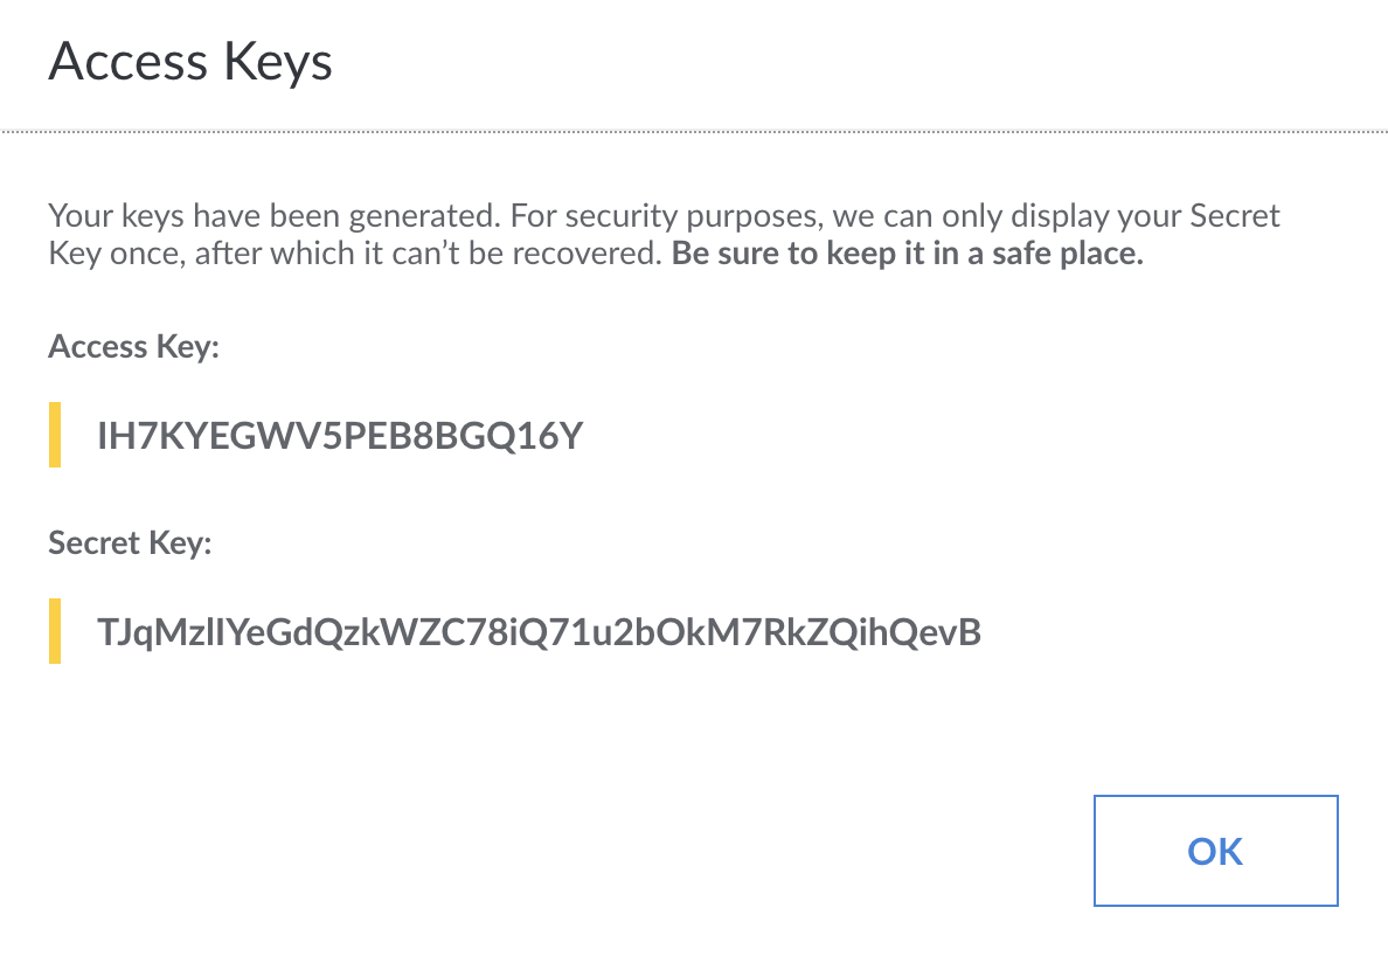
You now have the credentials needed to connect to Linode Object Storage.
Check the permissions you gave this key by clicking on the more options elipsis link to the right of the key in the Access Keys list. Then, select View Permissions from the menu.

An access key with limited permissions displays all the buckets and their selected permissions.
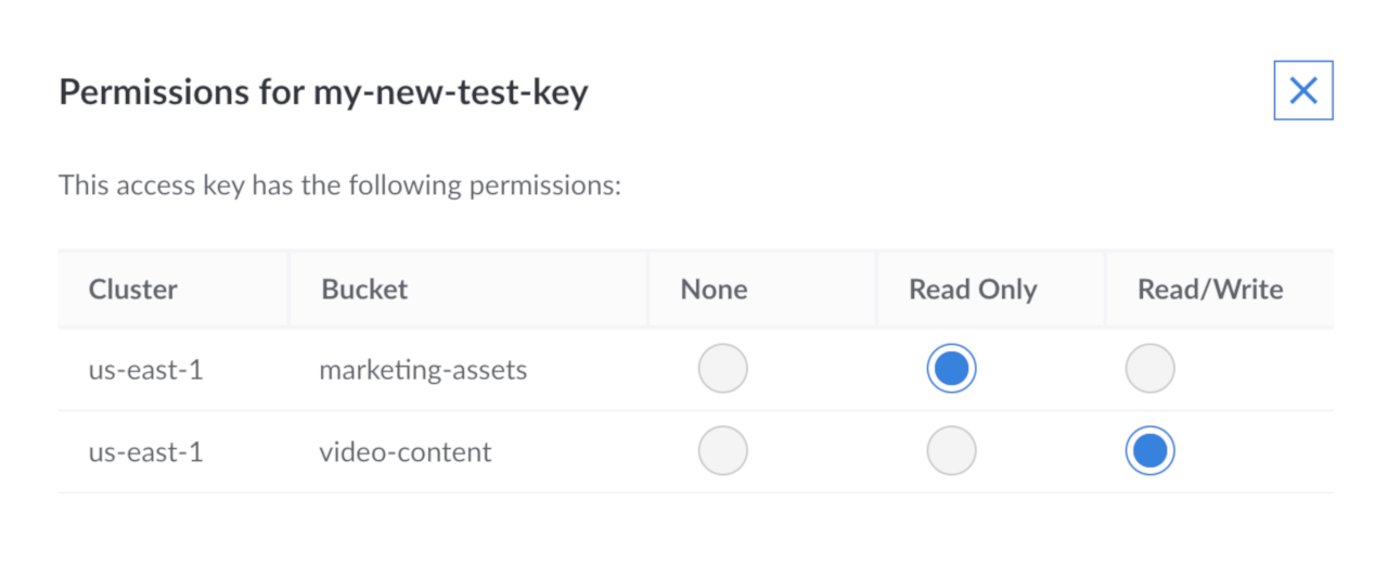
An access key that has full permissions displays a statement about unlimited access.

Limited Access Key Pairs
Limited Access Key Pairs can be used to assign limited access to a single bucket or a group of buckets, instead of the full account access that a
standard key pair provides. Permissions for limited Limited Access Keys are further divided between read_write and read_only permissions, which each allow access to a subset of s3 actions.
read_only permissions gives access to:
s3:GetBucketAcls3:GetBucketCORSs3:GetBucketLocations3:GetBucketLoggings3:GetBucketNotifications3:GetBucketPolicys3:GetBucketTaggings3:GetBucketVersionings3:GetBucketWebsites3:GetLifecycleConfigurations3:GetObjectAcls3:GetObjects3:GetObjectTorrents3:GetReplicationConfigurations3:GetObjectVersionAcls3:GetObjectVersions3:GetObjectVersionTorrents3:ListBucketMultipartUploadss3:ListBuckets3:ListBucketVersionss3:ListMultipartUploadParts
read_write permissions gives access to all of the read_only permissions, as well as:
s3:AbortMultipartUploads3:DeleteBucketWebsites3:DeleteObjects3:DeleteObjectVersions3:DeleteReplicationConfigurations3:PutBucketCORSs3:PutBucketLoggings3:PutBucketNotifications3:PutBucketTaggings3:PutBucketVersionings3:PutBucketWebsites3:PutLifecycleConfigurations3:PutObjects3:PutObjectAcls3:PutObjectVersionAcls3:PutReplicationConfigurations3:RestoreObject
Currently, Limited Access Key Pairs are only available using the Linode API.
NoteLimited Access Keys are able to list all Buckets under the Linode user account. Limited access keys do not otherwise have access to buckets on a single user account.
Control Access with ACLs and Bucket Policies
Linode Object Storage allows users to share access to objects and buckets with other Object Storage users. There are two mechanisms for setting up sharing: Access Control Lists (ACLs), and bucket policies. These mechanisms perform similar functions: both can be used to restrict and grant access to Object Storage resources. Learn more about ACLs and bucket policies.
Bucket Names
Bucket names, also referred to as labels, need to be unique within the same cluster, including buckets on other users' Linode accounts. This also means if you reserve a bucket name in one cluster, it is not automatically reserved in another. For example, if you have my-bucket.us-east-1.linode.com and want my-bucket.eu-central-1.linode.com you must manually reserve them both. They are separate clusters and not guaranteed. If the label you enter is already in use, then choose a different label. Additionally, bucket labels have the following rules:
- Cannot be formatted as IP addresses.
- Must be between 3 and 63 characters in length.
- Can only contain lower-case characters, numbers, periods, and dashes.
- Must start with a lowercase letter or number.
- Cannot contain underscores (_), end with a dash (-) or period (.), have consecutive periods (.), or use dashes (-) adjacent to periods (.).
NoteA cluster is defined as all buckets hosted by a unique URL; for example:us-east-1.linodeobjects.com,ap-south-1.linodeobjects.com, oreu-central-1.linodeobjects.com.
Object Storage TLS/SSL Certificates
Object storage supports the importing of custom TLS/SSL Certificates in order to encrypt connections with your bucket in transit. Currently, you can Upload, View, or Delete TLS/SSL certificates using the following API Endpoints:
- Upload Object Storage TLS/SSL Cert
- View Object Storage TLS/SSL Cert
- Delete Object Storage TLS/SSL Cert
Like all API endpoints, TLS/SSL certificates can additionally be added using the Linode CLI.
For more information on Object Storage Certificates, including configuration options in the Linode Manager, see our Guide for Custom Object Storage Certificates
Object Storage Tools
There are a number of tools that are available to help manage Linode Object Storage. This guide explains how to install and use the following options:
The Linode Cloud Manager can be used to create buckets, and upload and delete objects, as well as create access keys for use with the S3 compatible clients.
The Linode CLI has an Object Storage plugin and can be used to create and remove buckets, add and remove objects, and convert a bucket into a static site from the command line.
s3cmd is a powerful command line utility that can be used with any S3-compatible object storage service, including Linode’s. s3cmd can be used to create and remove buckets, add and remove objects, convert a bucket into a static site from the command line, plus other functions like syncing entire directories up to a bucket.
Cyberduck is a graphical utility available for Windows and macOS and is a great option if you prefer a GUI tool.
Cloud Manager
Create a Bucket
The Cloud Manager provides a web interface for creating buckets. To create a bucket:
If you have not already, log into the Linode Cloud Manager.
Click the Object Storage link in the sidebar, and then click Add a Bucket.
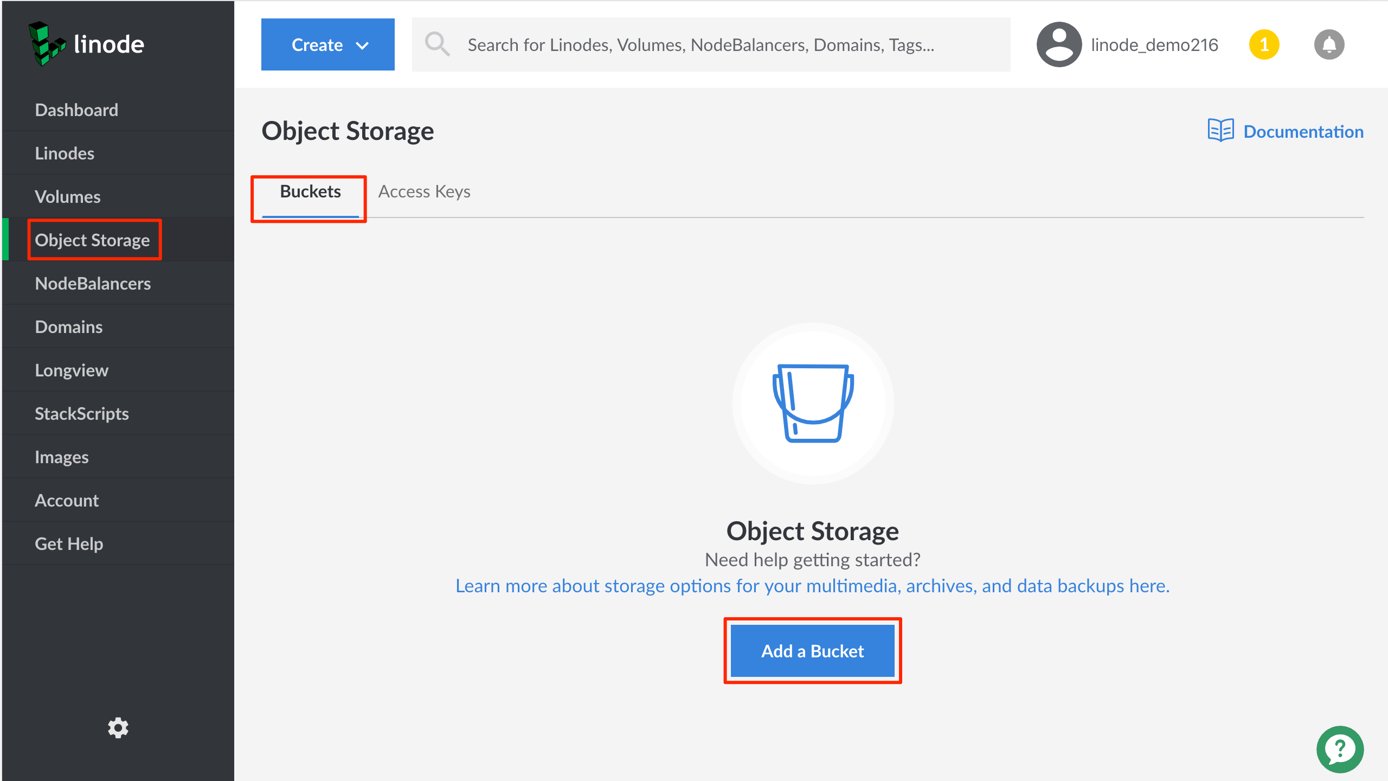
If you have not created an access key or a bucket before, you are prompted to enable Object Storage.
The Create a Bucket menu appears.
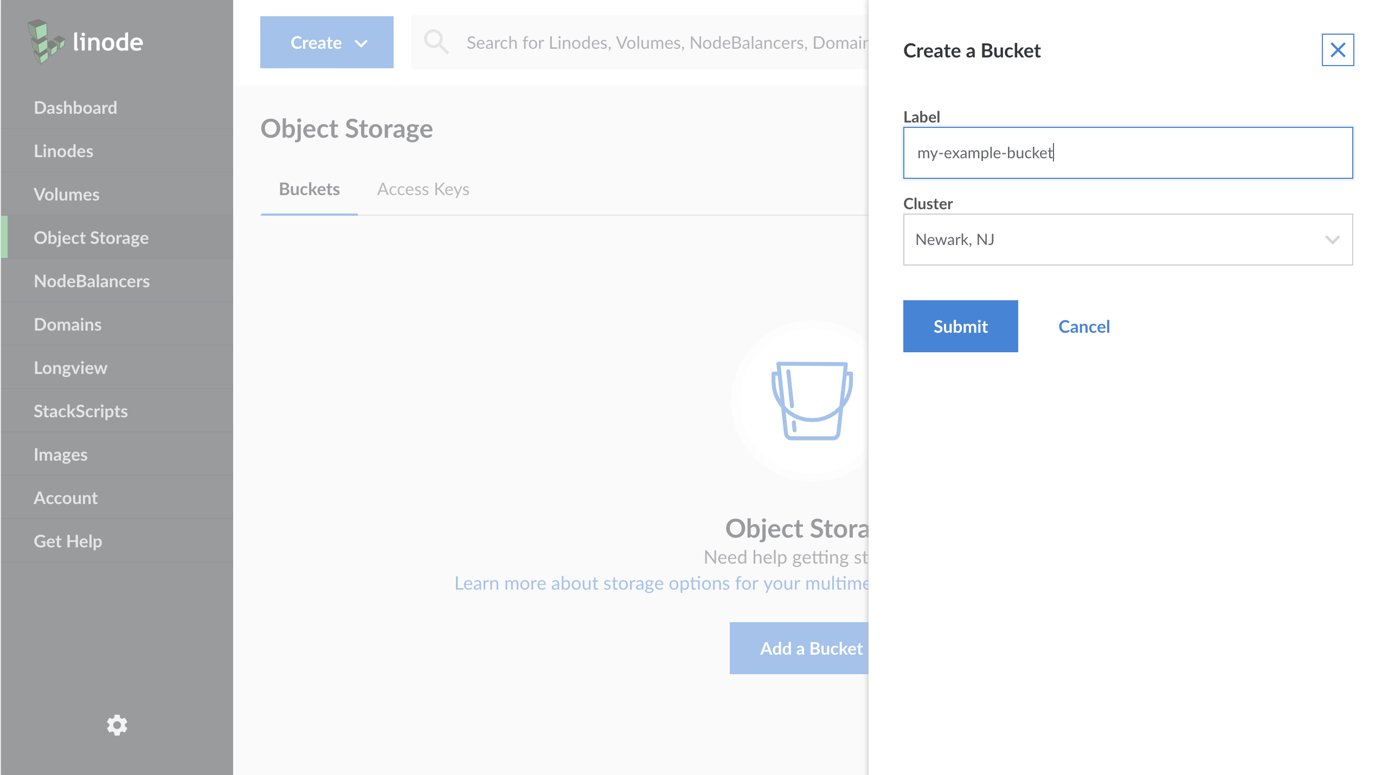
Add a label for the bucket. See the Bucket Name section for rules on naming the bucket.
Choose a cluster location for the bucket to reside in.
Note
A cluster is defined as all buckets hosted by a unique URL; for example:us-east-1.linodeobjects.com,ap-south-1.linodeobjects.com, oreu-central-1.linodeobjects.com.Click Submit. You are now ready to upload objects to the bucket.
Upload Objects to a Bucket
Follow these steps to upload objects to a bucket using the Cloud Manager:
If you have not already, log into the Linode Cloud Manager.
Click the Object Storage link in the sidebar. A list of all the buckets appears. Click the bucket where you want to upload the objects.
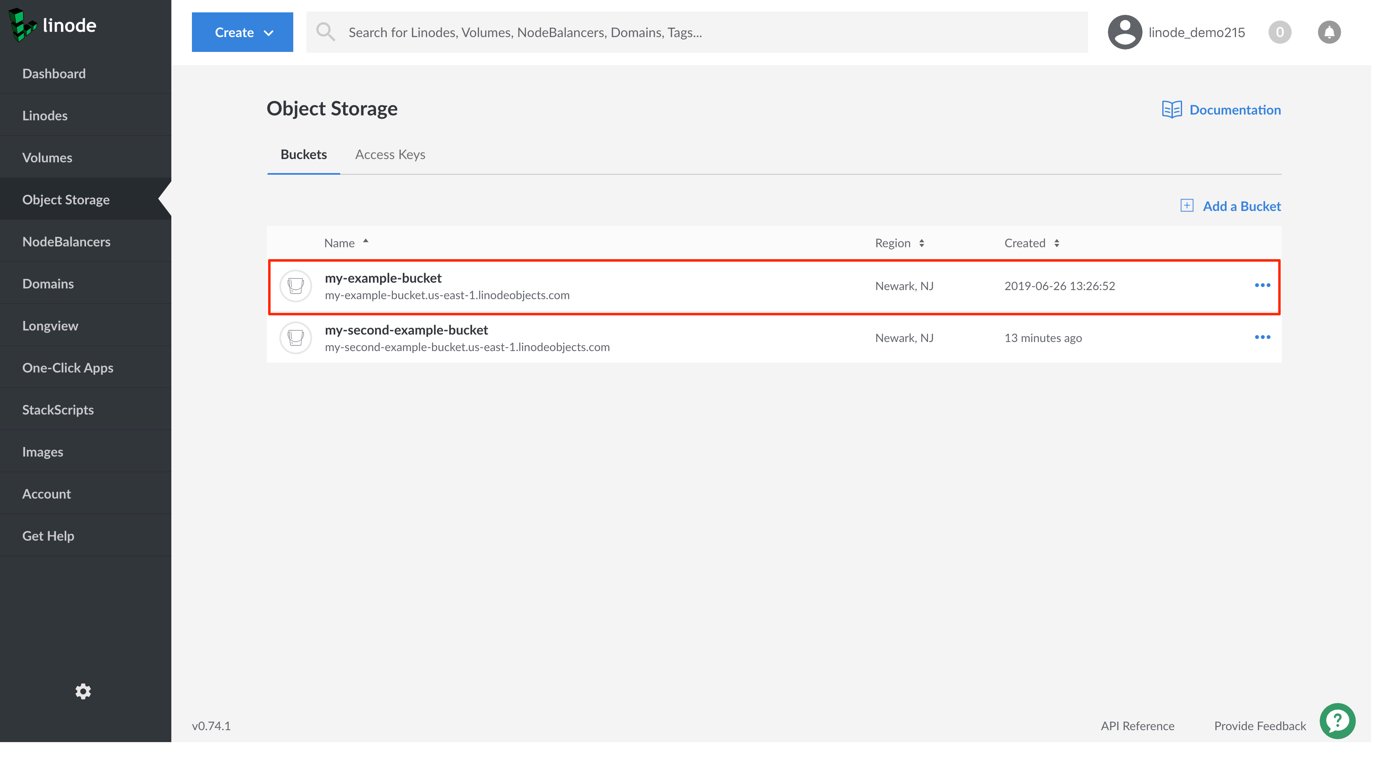
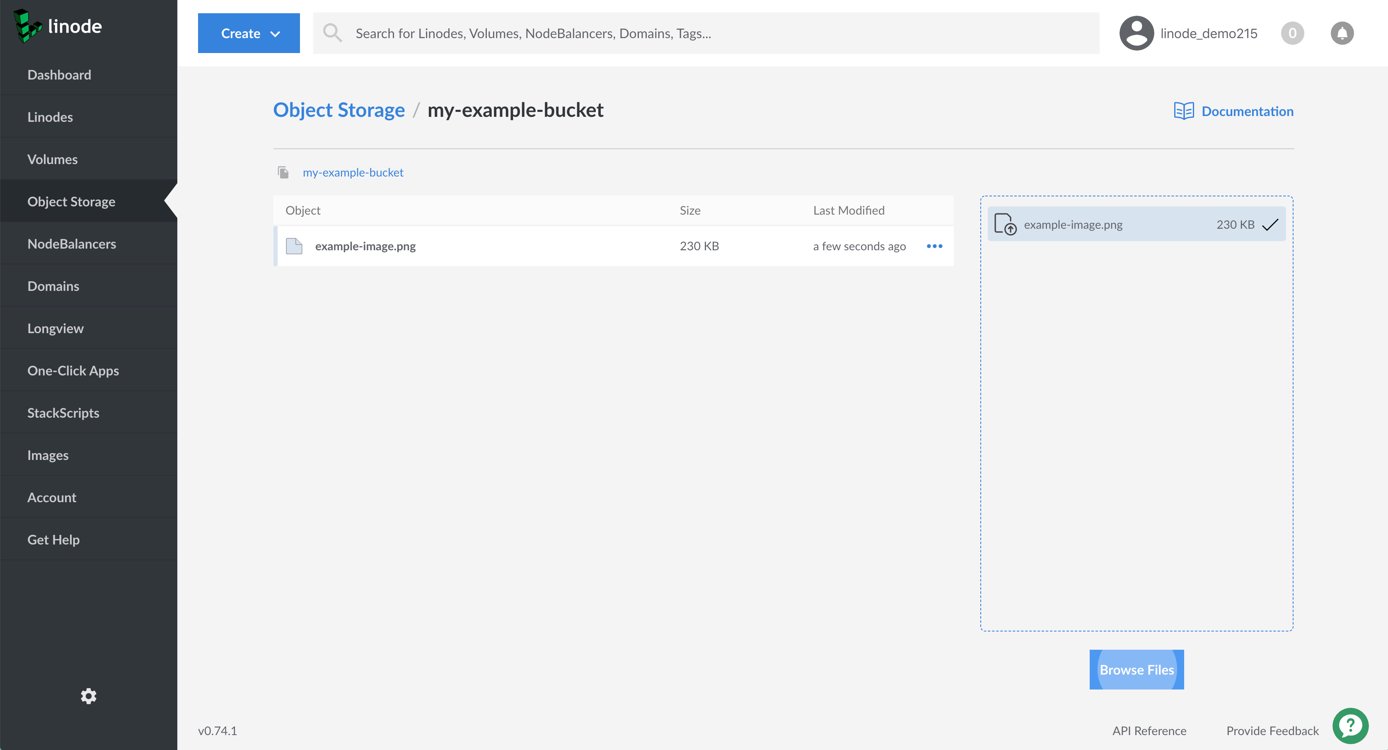
The bucket’s Objects Listing Page appears. In the example, the my-example-bucket does not yet contain any objects. You can use the Upload Files Pane to drag and drop a file from the local computer to the object storage bucket.
Note
You can drag and drop multiple files to the Upload Files Pane at one time.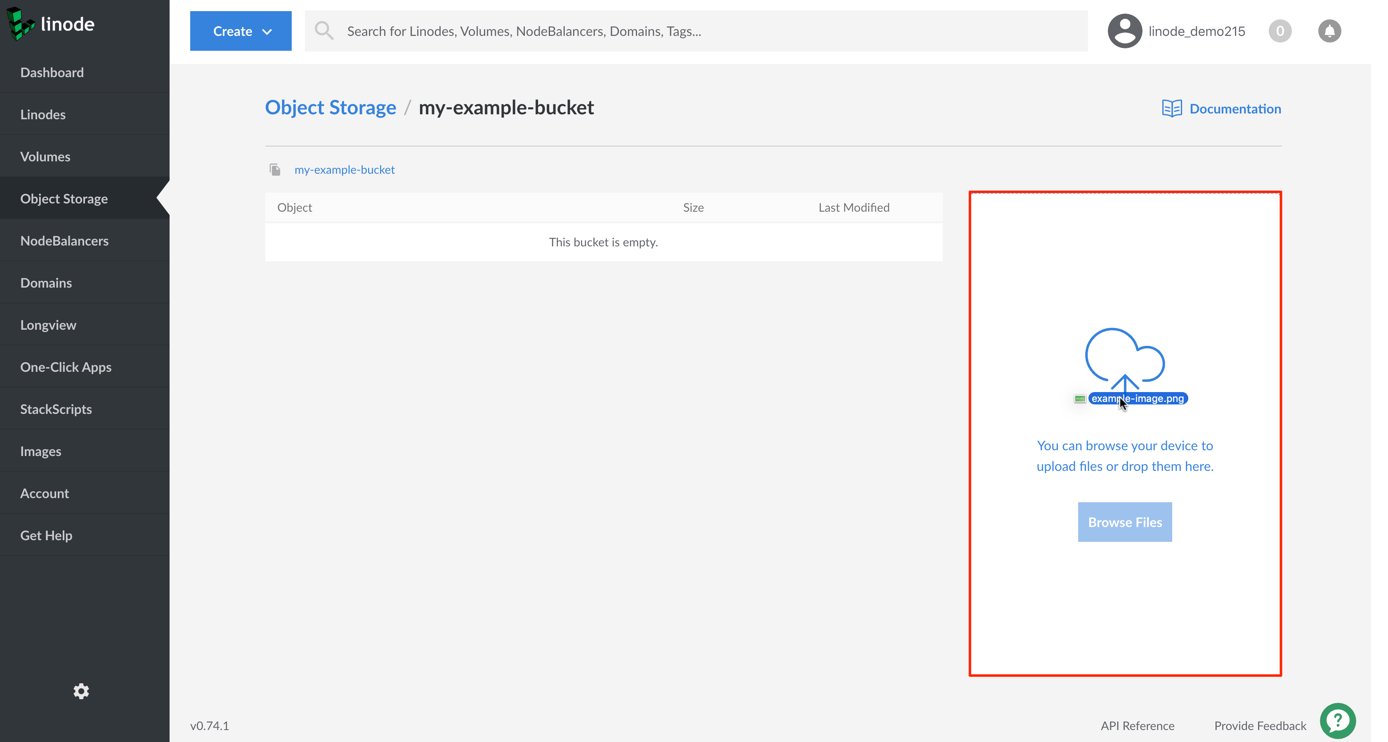
You can also click the Browse Files button to bring up the local computer’s file browser and select a file to upload to the bucket.
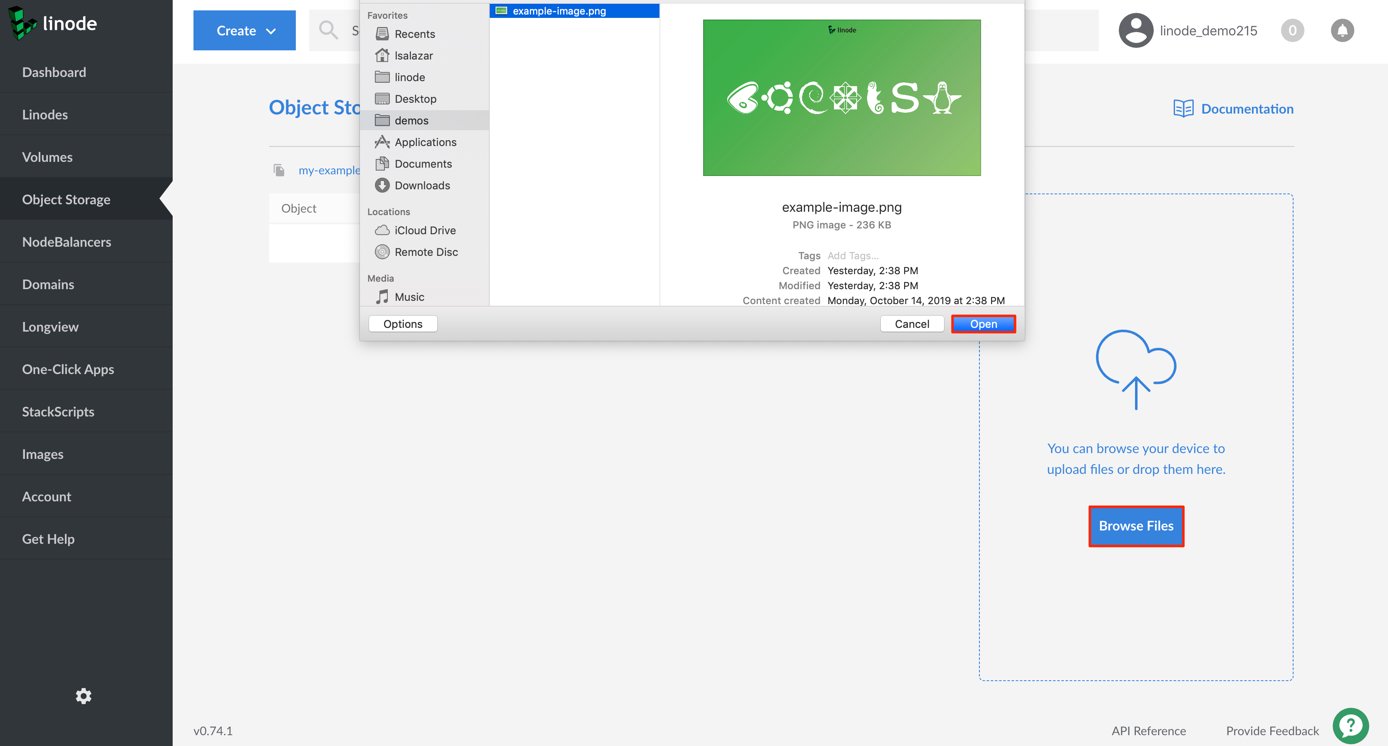
When the upload has completed, the object appears in the Objects Listing Page.
Note
View Bucket Objects
Follow these steps to view your objects from the Cloud Manager:
If you have not already, log into the Linode Cloud Manager.
Click the Object Storage link in the sidebar. A list of all the buckets appears. Click the bucket whose objects you’d like to view.

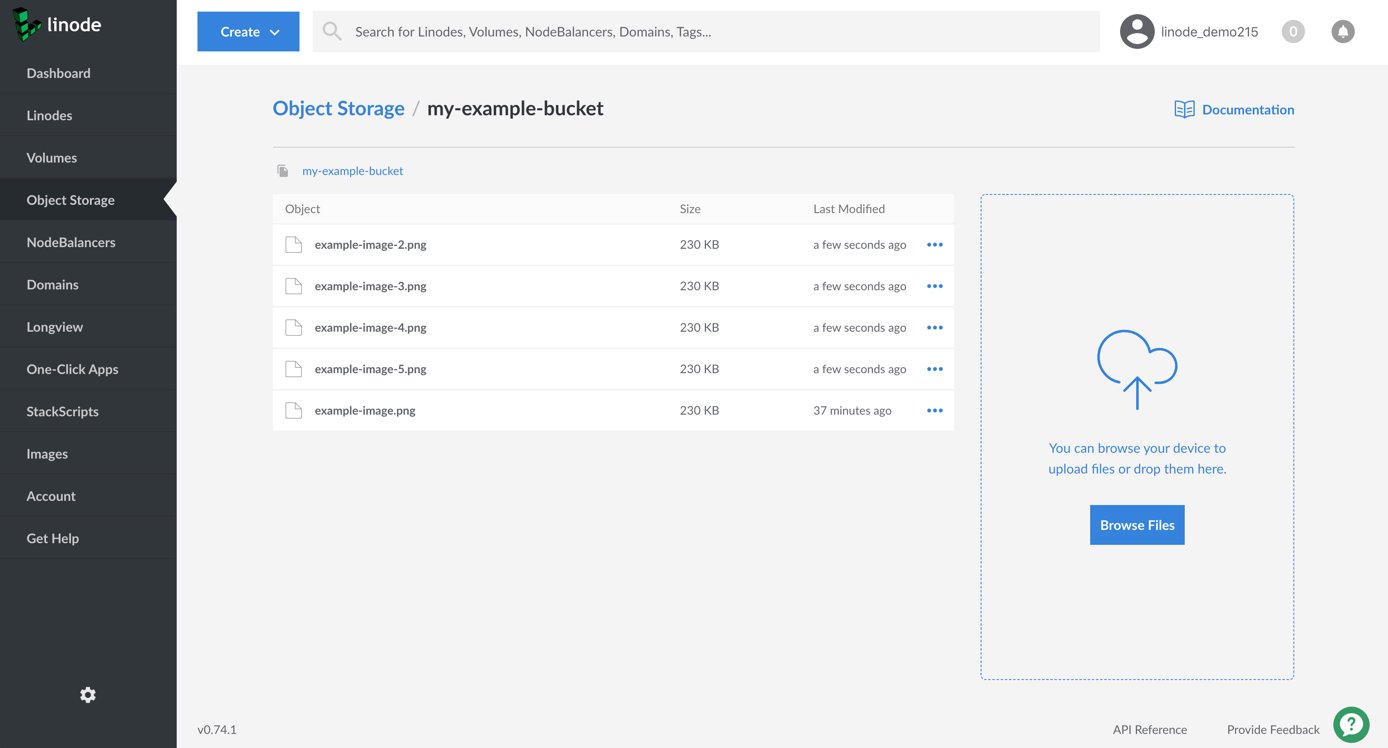
The bucket’s Objects Listing Page appears, which displays all the objects in the bucket.
Click the ellipsis menu corresponding to the object you’d like to view. Then, select Download.
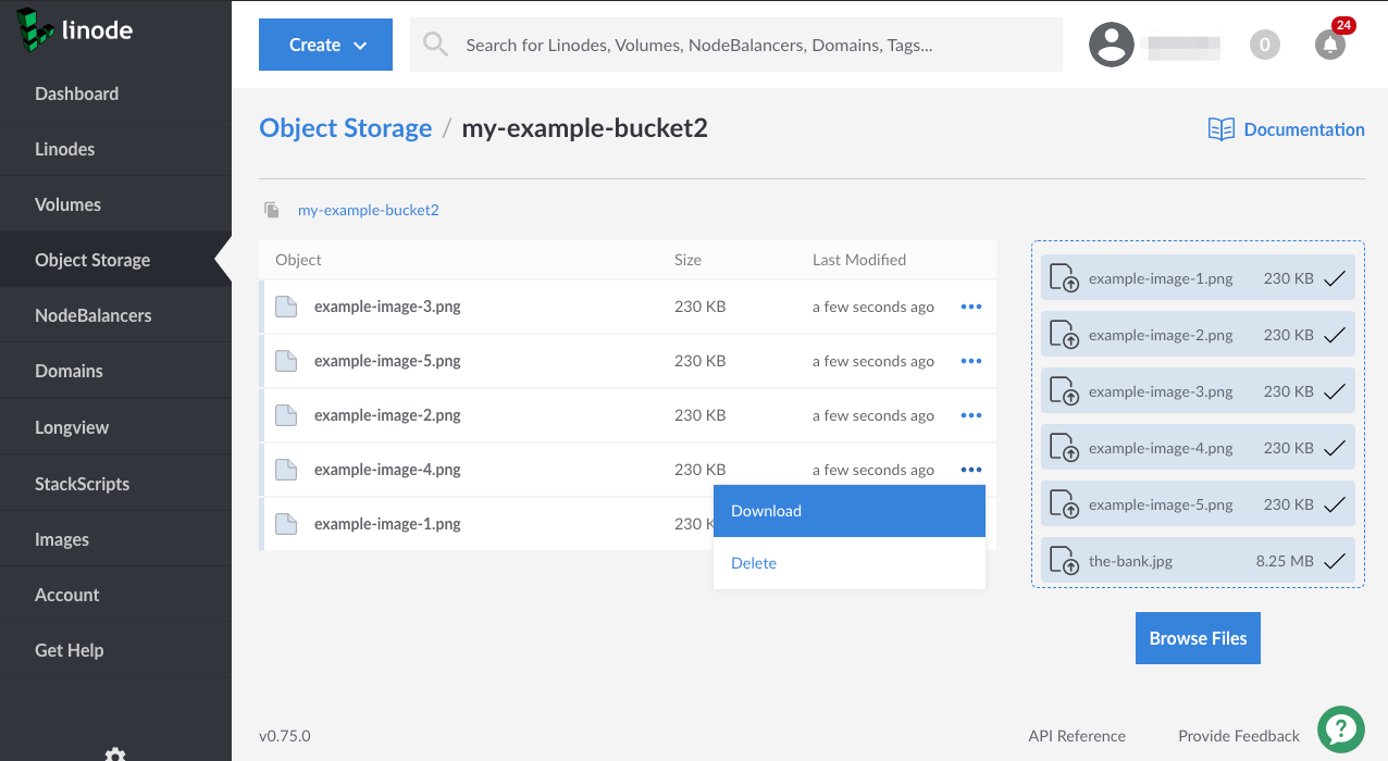
The object is downloaded to the local computer.
Delete Objects from a Bucket
Follow these steps to delete objects in a bucket from the Cloud Manager:
If you have not already, log into the Linode Cloud Manager.
Click the Object Storage link in the sidebar. A list of all the buckets appears. Click the bucket whose objects you’d like to delete.

The bucket’s Objects Listing Page appears, which displays all the objects in the bucket.

Click the ellipsis menu corresponding to the object you’d like to delete. Then, select Delete.
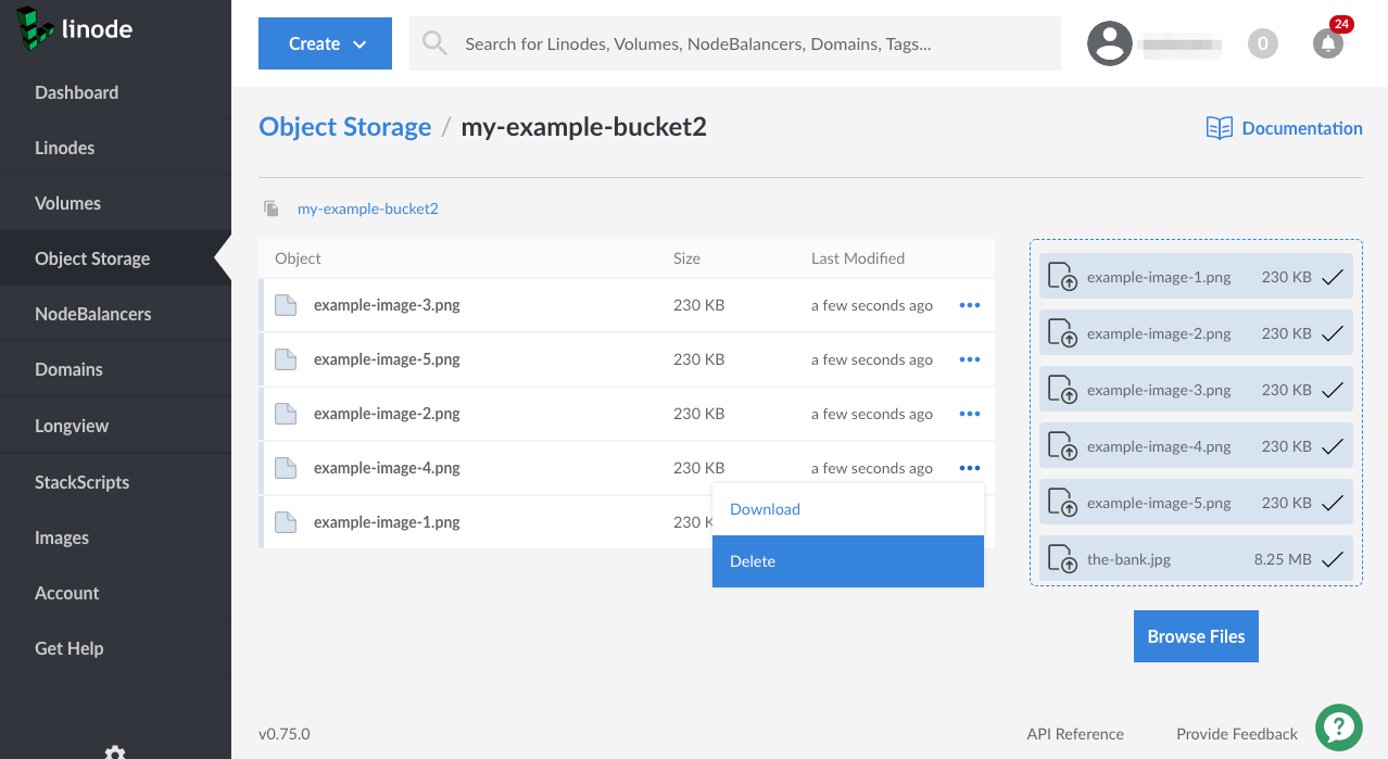
A dialog box appears prompting you to confirm if you’d like to delete the object. Click Delete to proceed. After the object has been deleted, it is no longer be visible on the Objects Listing Page.
Delete a Bucket
Follow these steps to delete an Object Storage bucket from the Cloud Manager:
NoteYou can only delete an empty Object Storage bucket. See the Delete Objects from a Bucket how-to for information on deleting a bucket’s objects using the Cloud Manager.
If you have not already, log into the Linode Cloud Manager.
Click the Object Storage link in the sidebar. A list of all the buckets appears.
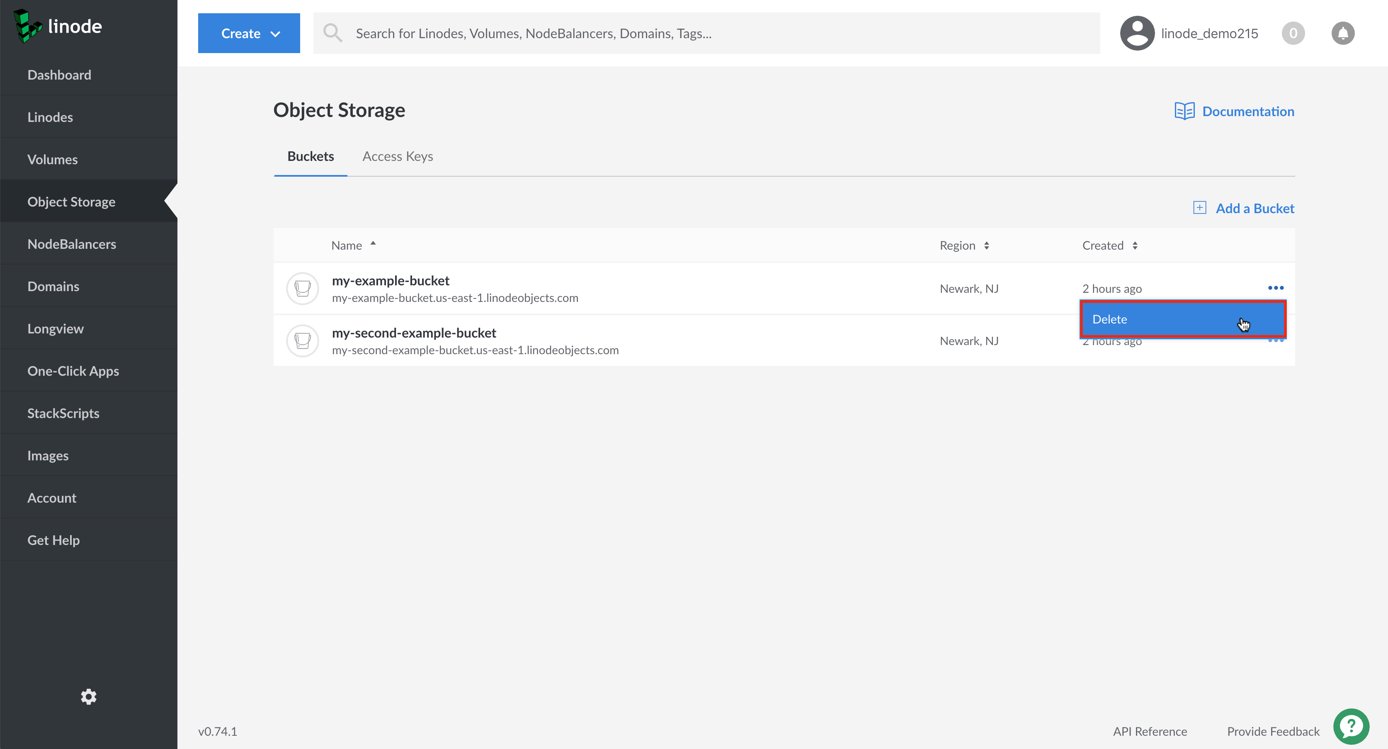
Click the ellipsis menu corresponding to the bucket you’d like to delete. Then, select Delete.
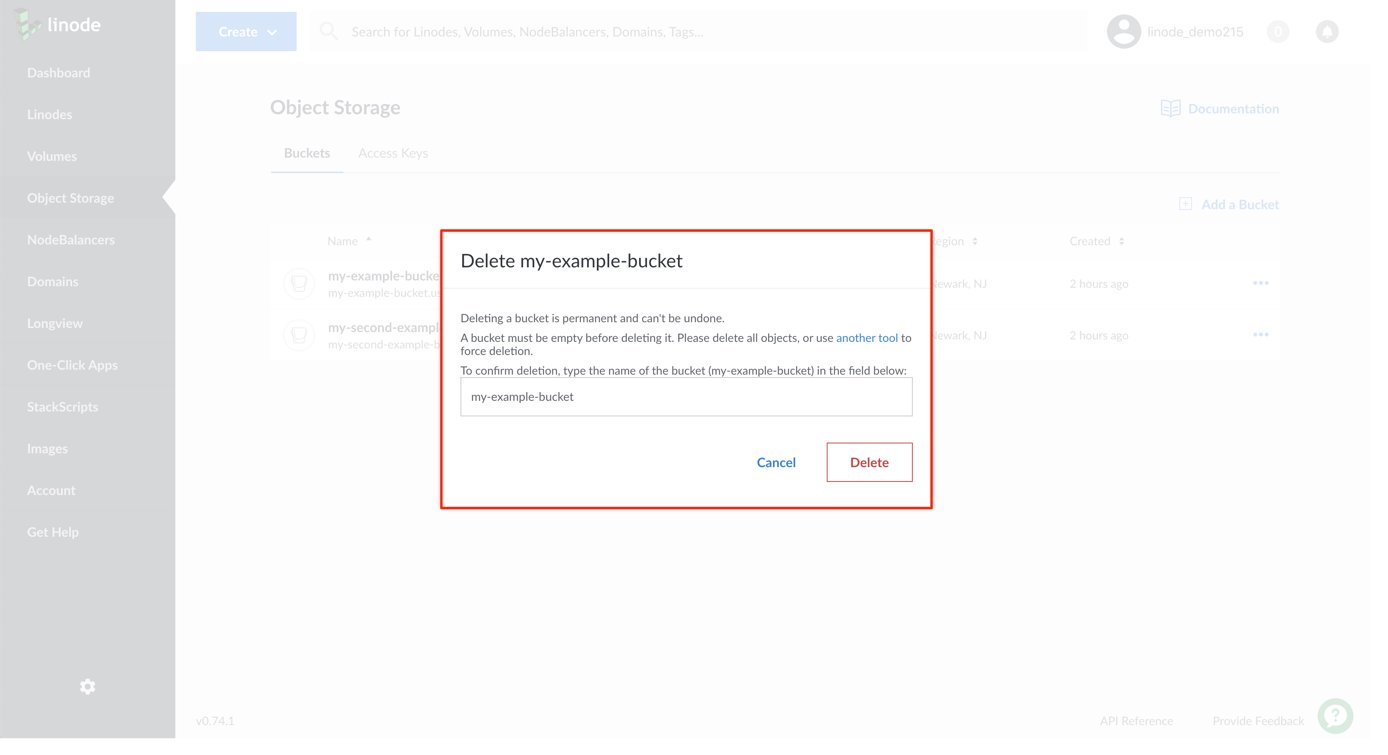
A dialog box appears that prompts you to enter the bucket’s name as a way to confirm that you’d like to delete the bucket. Type the bucket’s name into the text entry field and click Delete.
After the bucket has been deleted, it is no longer be visible on the Buckets Listing Page.
Linode CLI
The Linode Command Line Interface (CLI) is a command line utility that allows you complete control over the Linode account. With the Object Storage plugin, you can also create and remove buckets, upload objects, and more.
Install and Configure the CLI
Download the Linode CLI, or, if you have already downloaded it, make sure it has been upgraded to the latest version:
pip3 install linode-cli --upgradeConfigure the Object Storage plugin:
linode-cli obj --helpYou are prompted to enter the Personal Access Token and default settings for deploying new Linodes.
Install the
botomodule:pip3 install boto
Now you are ready to create buckets and upload objects.
Create a Bucket with the CLI
To create a bucket with the Linode CLI, use the mb command. See the
Bucket Name section for rules on naming the bucket.
linode-cli obj mb my-example-bucket
To delete a bucket, use the rb command:
linode-cli obj rb my-example-bucket
Currently, the Linode CLI defaults to creating buckets in the Newark data center. To change the cluster a bucket is created in, use the --cluster option, followed by the cluster name below:
us-east-1for the Newark data center. This is the current default.eu-central-1for the Frankfurt data center.ap-south-1for the Singapore data center.
NoteYou need to use the--clusteroption for every interaction with your bucket if it is not inus-east-1.
If the bucket has objects in it, you can not delete it from the Linode CLI immediately. Instead, remove the objects first, then delete the bucket. The s3cmd tool has commands for deleting all objects from a bucket, and it can also force-delete a bucket with objects in it.
Upload, Download, and Delete an Object with the CLI
As an example object, create a text file and fill it with some example text.
echo 'Hello World!' > example.txtTo upload an object to a bucket using the Linode CLI, use the
putcommand. Provide the object name as the first parameter and the bucket label as the second:linode-cli obj put --acl-public example.txt my-example-bucket- If the bucket is in the Newark data center, the file is accessible at the URL
http://my-example-bucket.us-east-1.linodeobjects.com/example.txt. - If the bucket is in the Frankfurt data center, the file is accessible at the URL
http://my-example-bucket.eu-central-1.linodeobjects.com/example.txt. - If the bucket is in the Singapore data center, the file is accessible at the URL
https://my-example-bucket.ap-south-1.linodeobjects.com/example.txt
Note
The
--acl-publicflag is used to make the object publicly accessible, meaning that you can access the object from its URL. By default, all objects are set to private. To make a public file private, or a private file public, use thesetaclcommand and supply the corresponding flag.For example, if you want to make a public file private, you would append the
--acl-privateflag:linode-cli obj setacl --acl-private my-example-bucket example.txt- If the bucket is in the Newark data center, the file is accessible at the URL
To download an object, use the
getcommand. Provide the label of the bucket as the first parameter and the name of the file as the second:linode-cli obj get my-example-bucket example.txtTo delete an object, use the
rmordelcommand. Provide the label of the bucket as the first parameter and the name of the object as the second:linode-cli obj rm my-example-bucket example.txt
Create a Signed URL with the CLI
Creating a signed URL allows you to create a link to objects with limited permissions and a time limit to access them. To create a signed URL on a preexisting object with the CLI, use the following syntax:
linode-cli obj signurl my-example-bucket example.txt +300
The output of the command is a URL that can be used for a set period of time to access the object, even if the ACL is set to private. In this case, +300 represents the amount of time in seconds that the link remains active, or five minutes total. After this time has passed, the link expires and can no longer be used.
Create a Static Site with the CLI
To create a static website from a bucket:
Use the
ws-createcommand, including the--ws-indexand--ws-errorflags:linode-cli obj ws-create my-example-bucket --ws-index=index.html --ws-error=404.htmlThe
--ws-indexand--ws-errorflags specify which objects the bucket should use to serve the static site’s index page and error page, respectively.You need to separately upload the
index.htmland404.htmlfiles (or however you have named the index and error pages) to the bucket:echo 'Index page' > index.html echo 'Error page' > 404.html linode-cli obj put index.html 404.html my-example-bucketSet the
--aclpublicflag on both theindex.htmland404.htmlfiles:linode-cli obj setacl --acl-public my-example-bucket index.html linode-cli obj setacl --acl-public my-example-bucket 404.htmlThe static site is accessed from a different URL than the generic URL for the Object Storage bucket. Static sites are available at the
website-us-east-1subdomain for the Newark data center, thewebsite-eu-central-1subdomain for the Frankfurt data center, or thewebsite-ap-south-1subdomain for the Singapore data center. Usingmy-example-bucketas an example, navigate to either:http://my-example-bucket.website-us-east-1.linodeobjects.comorhttp://my-example-bucket.website-eu-central-1.linodeobjects.comorhttp://my-example-bucket.website-ap-south-1.linodeobjects.com
For more information on hosting static websites from Linode Object Storage, see Host a Static Site on Linode’s Object Storage guide.
Creating a New Access Key
If for whatever reason the access key you’ve set up when initially Configuring the CLI has been revoked or deleted, you may see the following error message:
Error: InvalidAccessKeyId
You can create and configure a new Access Key at any time by running the following command:
linode-cli obj regenerate-keys
After running the command the access is restored, and you can see the new key listed at any time using the following command:
linode-cli-linode-cli object-storage keys-list
NoteAny new object storage keys issued through the CLI is prefixed withlinode-clias the label.
Other CLI Commands
To get a list of all available buckets, use the ls command:
linode-cli obj ls
To get a list of all objects in a bucket, use the ls command with the label of a bucket:
linode-cli obj ls my-example-bucket
For a complete list of commands available with the Object Storage plugin, use the --help flag:
linode-cli obj --help
s3cmd
s3cmd is a command line utility that you can use for any S3-compatible Object Storage.
Install and Configure s3cmd
s3cmd can be downloaded using
apton Debian and Ubuntu, and Homebrew on macOS. To download s3cmd using Homebrew, run the following command:brew install s3cmdNote
On macOS, s3cmd might fail to install if you do not have XCode command line tools installed. If that is the case, run the following command:
xcode-select --installYou are prompted to agree to the terms and conditions.
To install s3cmd on Debian or Ubuntu, run the following command:
apt install s3cmdAfter s3cmd has been installed, you need to configure it:
s3cmd --configureA number of questions are presented. To accept the default answer that appears within the brackets, press enter. Here is an example of the answers you need to provide. Substitute
eu-central-1for the subdomain if the bucket is in the Frankfurt data center:Access Key: 4TQ5CJGZS92LLEQHLXB3 Secret Key: enteryoursecretkeyhere Default Region: US S3 Endpoint: us-east-1.linodeobjects.com DNS-style bucket+hostname:port template for accessing a bucket: us-east-1.linodeobjects.com Encryption password: YOUR_GPG_KEY Path to GPG program: /usr/local/bin/gpg Use HTTPS protocol: False HTTP Proxy server name: HTTP Proxy server port: 0Note
It is not necessary to provide a GPG key when configuring s3cmd, though it allows you to store and retrieve encrypted files. If you do not wish to configure GPG encryption, you can leave theEncryption passwordandPath to GPG programfields blank.When you are done, enter
Yto save the configuration.Note
s3cmd offers a number of additional configuration options that are not presented as prompts by the
s3cmd --configurecommand. One of those options iswebsite_endpoint, which instructs s3cmd on how to construct an appropriate URL for a bucket that is hosting a static site, similar to theS3 Endpointin the above configuration. This step is optional, but ensures that any commands that contain the static site’s URL outputs the right text. To edit this configuration file, open the~/s3.cfgfile on the local computer. This is most likely located in ‘/home/$user/.s3cfg’ if you are using a Linux-based system:nano ~/.s3cfgAdd the following values:
host_base = us-east-1.linodeobjects.com
host_bucket = %(bucket)s.us-east-1.linodeobjects.com
website_endpoint = http://%(bucket)s.website-us-east-1.linodeobjects.com/
Note: Use the
eu-central-1subdomain for buckets in the Frankfurt data center, and theap-south-1subdomain for buckets in the Singapore data center.
You are now ready to use s3cmd to create a bucket in Object Storage.
Create a Bucket with s3cmd
You can create a bucket with s3cmd using the mb command, replacing my-example-bucket with the label of the bucket you would like to create. See the
Bucket Name section for rules on naming the bucket.
s3cmd mb s3://my-example-bucket
To remove a bucket, you can use the rb command:
s3cmd rb s3://my-example-bucket
CautionTo delete a bucket that has files in it, include the
--recursive(or-r) option and the--force(or-f) option. Use caution when running this command:s3cmd rb -r -f s3://my-example-bucket/
Upload, Download, and Delete an Object with s3cmd
As an example object, create a text file and fill it with some example text.
echo 'Hello World!' > example.txtNow, transfer the text file object to the bucket using s3cmd’s
putcommand, replacingmy-example-bucketwith the label of the bucket you gave in the last section:s3cmd put example.txt s3://my-example-bucket -PNote
The-Pflag at the end of the command instructs s3cmd to make the object public. To make the object private, which means you only access it from a tool such as s3cmd, simply leave the ‘-P’ flag out of the command.Note
If you chose to enable encryption when configuring s3cmd, you can store encrypted objects by supplying the
-eflag:s3cmd put -e encrypted_example.txt s3://my-example-bucketThe object is uploaded to the bucket, and s3cmd provides a public URL for the object:
upload: 'example.txt' -> 's3://my-example-bucket/example.txt'  [1 of 1]
13 of 13   100% in    0s   485.49 B/s  done
Public URL of the object is: http://us-east-1.linodeobjects.com/my-example-bucket/example.txt
Note
The URL for the object that s3cmd provides is one of two valid ways to access the object. The first, which s3cmd provides, places the label of the bucket after the domain name. You can also access the object by affixing the bucket label as a subdomain:http://my-example-bucket.us-east-1.linodeobjects.com/example.txt. The latter URL is generally favored.To retrieve a file, use the
getcommand:s3cmd get s3://my-example-bucket/example.txtIf the file you are attempting to retrieve is encrypted, you can retrieve it using the
-eflag:s3cmd get -e s3://my-example-bucket/encrypted_example.txtTo delete a file, you can use the
rmcommand:s3cmd rm s3://my-example-bucket/example.txtCaution
To delete all files in a bucket, include the
--recursive(or-r) option and the--force(or-f) option. Use caution when running this command:s3cmd rm -r -f s3://my-example-bucket/To list all available buckets, use the
lscommand:s3cmd lsTo list all objects in a bucket, use the
lscommand and provide a bucket:s3cmd ls s3://my-example-bucket
Create a Signed URL with s3cmd
Creating a signed URL allows you to create a link to objects with limited permissions and a time limit to access them. To create a signed URL on a preexisting object with s3cmd, use the following syntax:
s3cmd signurl s3://my-example-bucket/example.txt +300
The output of the command is a URL that can be used for a set period of time to access the object, even if the ACL is set to private. In this case, +300 represents the amount of time in seconds that the link remains active, or five minutes total. After this time has passed, the link expires and can no longer be used.
Create a Static Site with s3cmd
You can also create a static website using Object Storage and s3cmd:
To create a website from a bucket, use the
ws-createcommand:s3cmd ws-create --ws-index=index.html --ws-error=404.html s3://my-example-bucketThe
--ws-indexand--ws-errorflags specify which objects the bucket should use to serve the static site’s index page and error page, respectively.You need to separately upload the
index.htmland404.htmlfiles (or however you have named the index and error pages) to the bucket:echo 'Index page' > index.html echo 'Error page' > 404.html s3cmd put index.html 404.html s3://my-example-bucketThe static site is accessed from a different URL than the generic URL for the Object Storage bucket. Static sites are available at the
website-us-east-1subdomain for the Newark data center, thewebsite-eu-central-1subdomain for the Frankfurt data center, and thewebsite-ap-south-1subdomain for the Singapore data center. Usingmy-example-bucketas an example, you would navigate to either:http://my-example-bucket.website-us-east-1.linodeobjects.comorhttp://my-example-bucket.website-eu-central-1.linodeobjects.com.
For more information on hosting a static website with Object Storage, read our Host a Static Site using Linode Object Storage guide.
Other s3cmd Commands
To upload an entire directory of files, you can use the sync command, which automatically syncs all new or changed files. Navigate to the directory you would like to sync, then enter the following:
s3cmd sync . s3://my-example-bucket -P
This can be useful for uploading the contents of a static site to the bucket.
NoteThe period in the above command instructs s3cmd to upload the current directory. If you do not want to first navigate to the directory you wish to upload, you can provide a path to the directory instead of the period.
Cyberduck
Cyberduck is a desktop application that facilitates file transfer over FTP, SFTP, and a number of other protocols, including S3.
Install and Configure Cyberduck
Download Cyberduck by visiting their website.
After you have Cyberduck installed, open the program and click Open Connection.
At the top of the Open Connection dialog, select Amazon S3 from the dropdown menu.
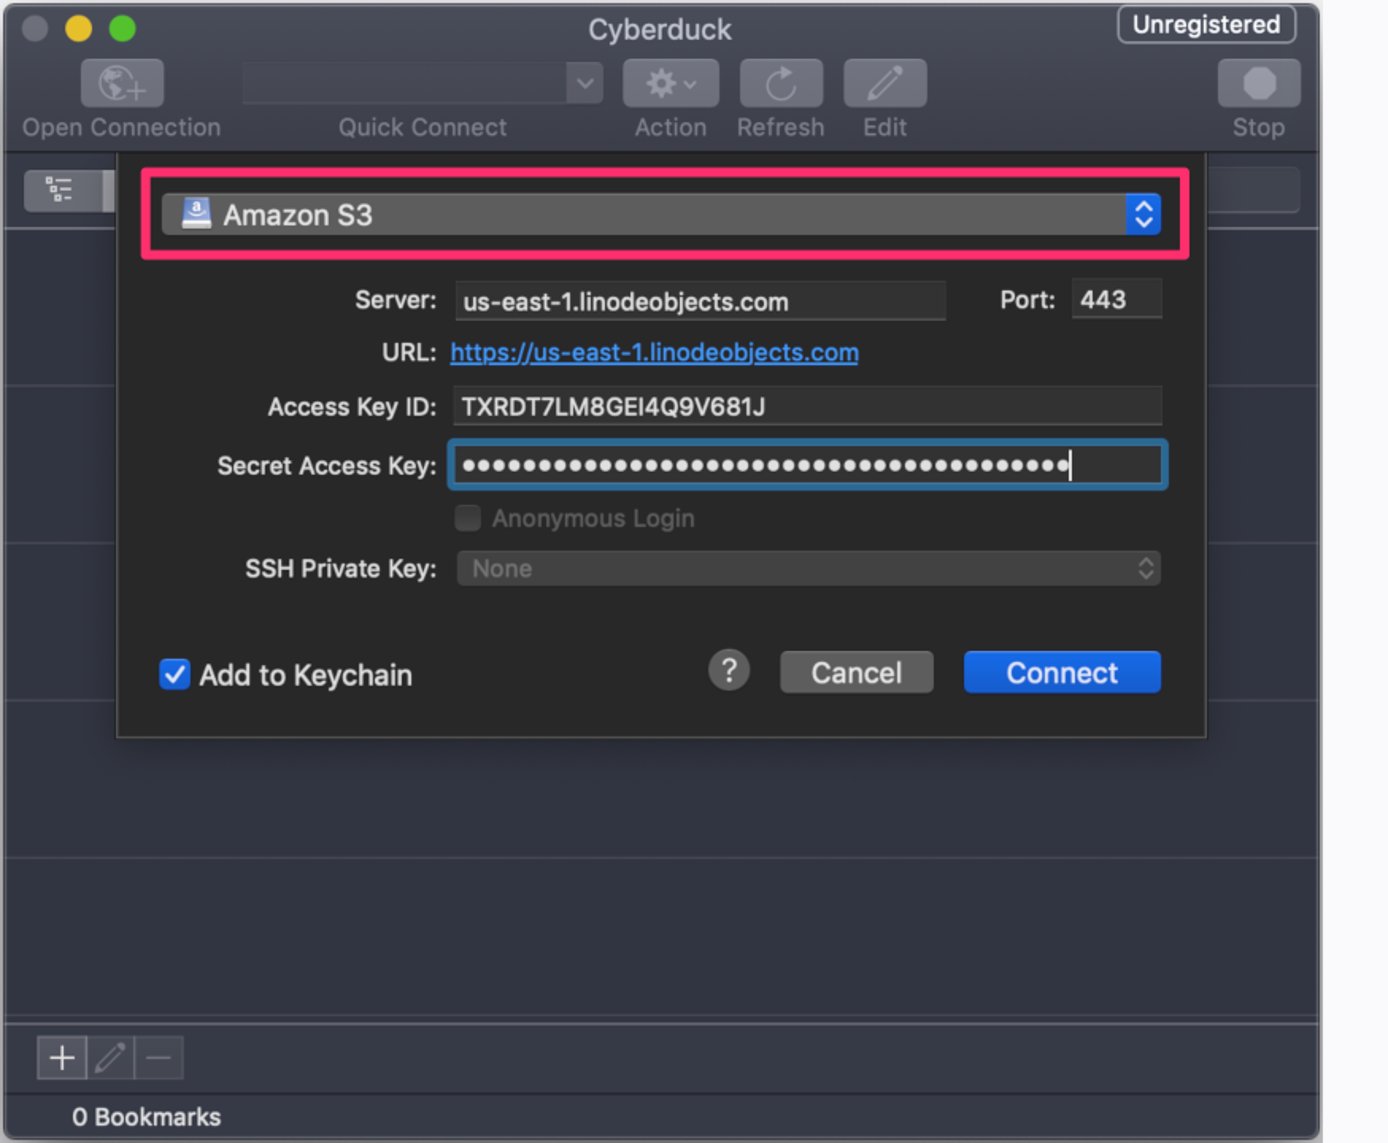
For the Server address, enter either
us-east-1.linodeobjects.comif the bucket is in the Newark data center,eu-central-1.linodeobjects.comif the bucket is in the Frankfurt data center, orap-south-1.linodeobjects.comif the bucket is in the Singapore data center.Enter the access key in the Access Key ID field, and the secret key in the Secret Access Key field.
Click Connect.
You are now ready to create a bucket in Object Storage.
Create a Bucket with Cyberduck
To create a bucket in Cyberduck:
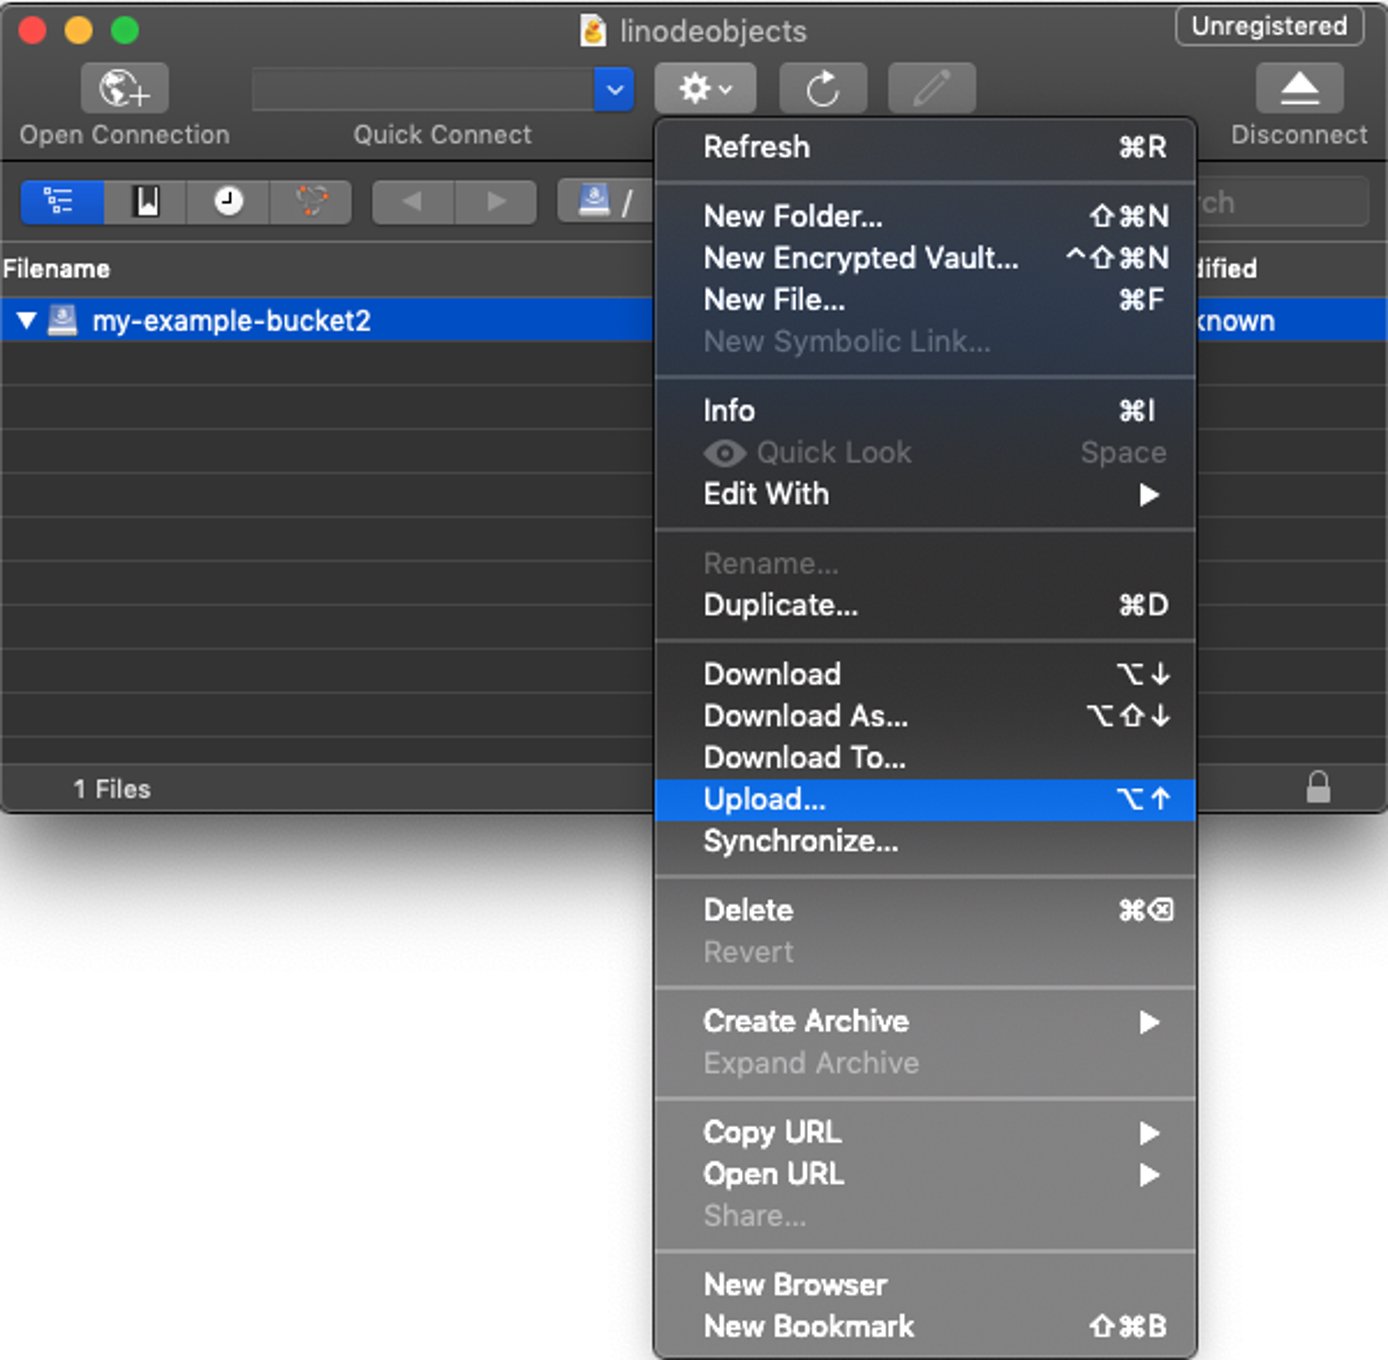
Right click within the window frame, or click Action, then click New Folder:
Enter the bucket’s label and then click Create. See the Bucket Name section for rules on naming the bucket.
To delete the bucket using Cyberduck, right click the bucket and select Delete.
Upload, Download, and Delete an Object with Cyberduck
To upload objects with Cyberduck, you can simply drag and drop the object, or directory of objects, to the bucket you’d like to upload them to, and Cyberduck does the rest. Alternatively, you can click the Action button and select Upload from the menu:
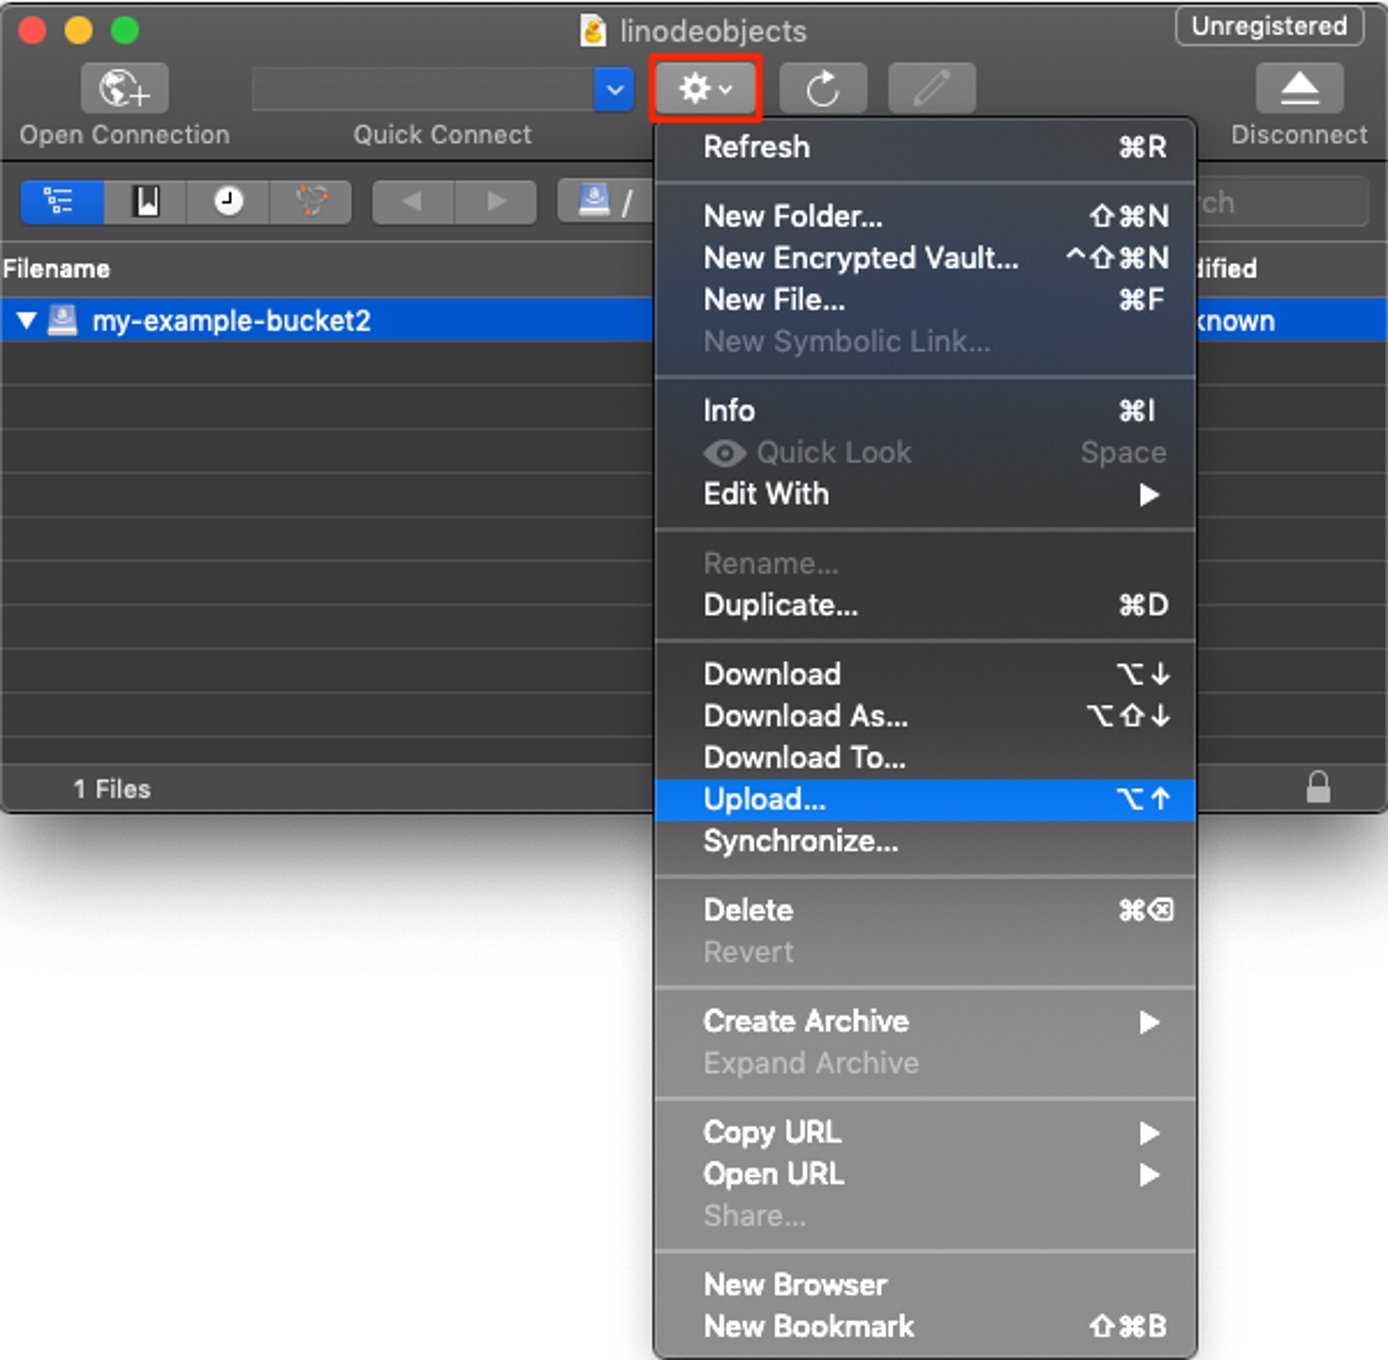
To make the objects publicly accessible, meaning that you can access them from the object’s URL, you need to set the proper READ permissions. Right click the object and select Info.
Click the Permissions tab.
Click the gear icon at the bottom of the window and select Everyone.
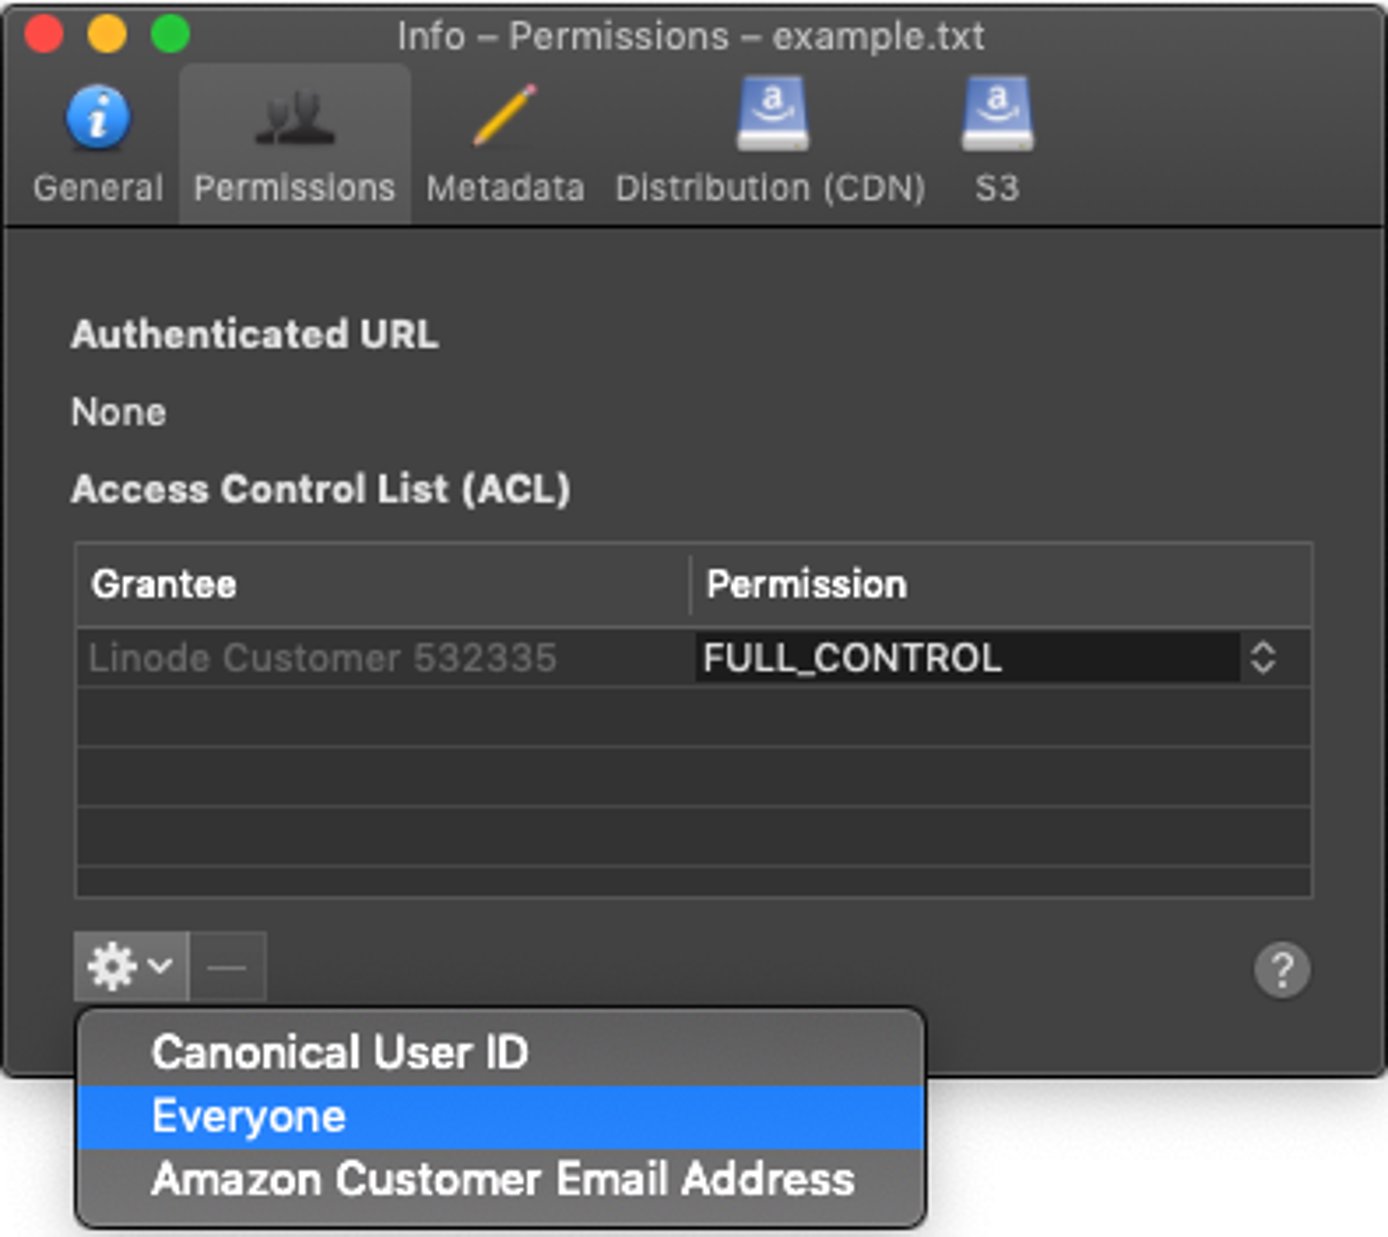
A new entry for Everyone appears in the Access Control List. Next to Everyone, under Permissions column heading, select READ from the drop down menu.
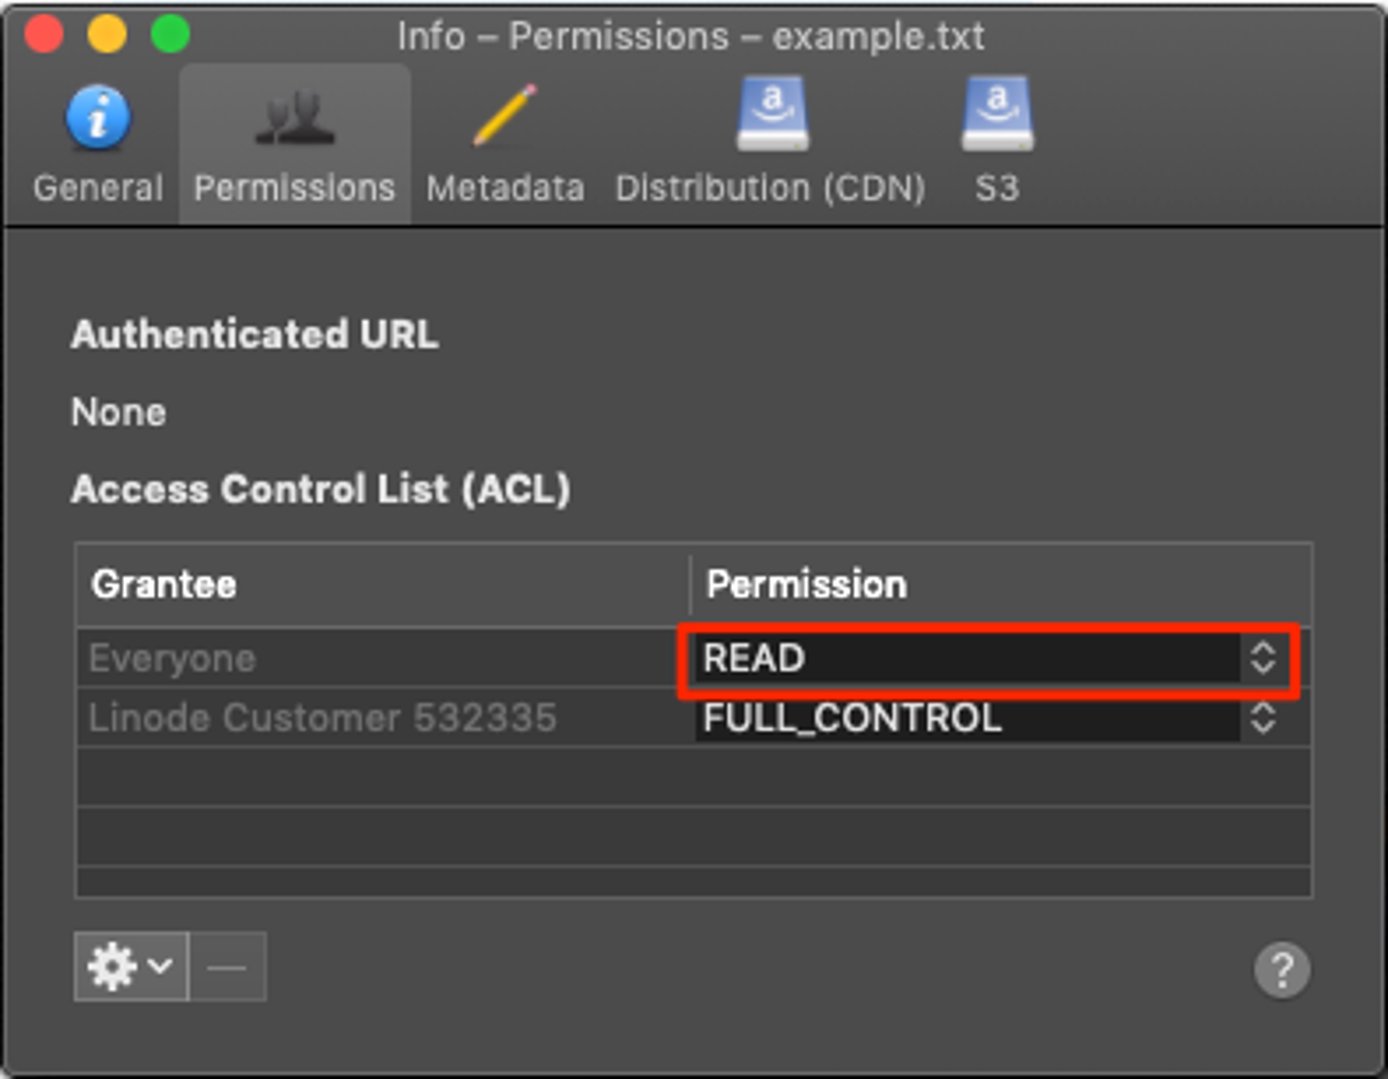
The object is now accessible through the internet, at the URL
http://my-example-bucket.us-east-1.linodeobjects.com/example.txt, wheremy-example-bucketis the label of the bucket,us-east-1.linodeobjects.comis the cluster where the bucket is hosted, andexample.txtis the name of the object.To download an object, right click the object and select Download, or click Download As if you’d like to specify the location of the download.
To delete an object, right click the object name and select Delete.
Create a Static Site with Cyberduck
To create a static site from the bucket:
Select a bucket, then right click the bucket or select the Action button at the top of the menu.
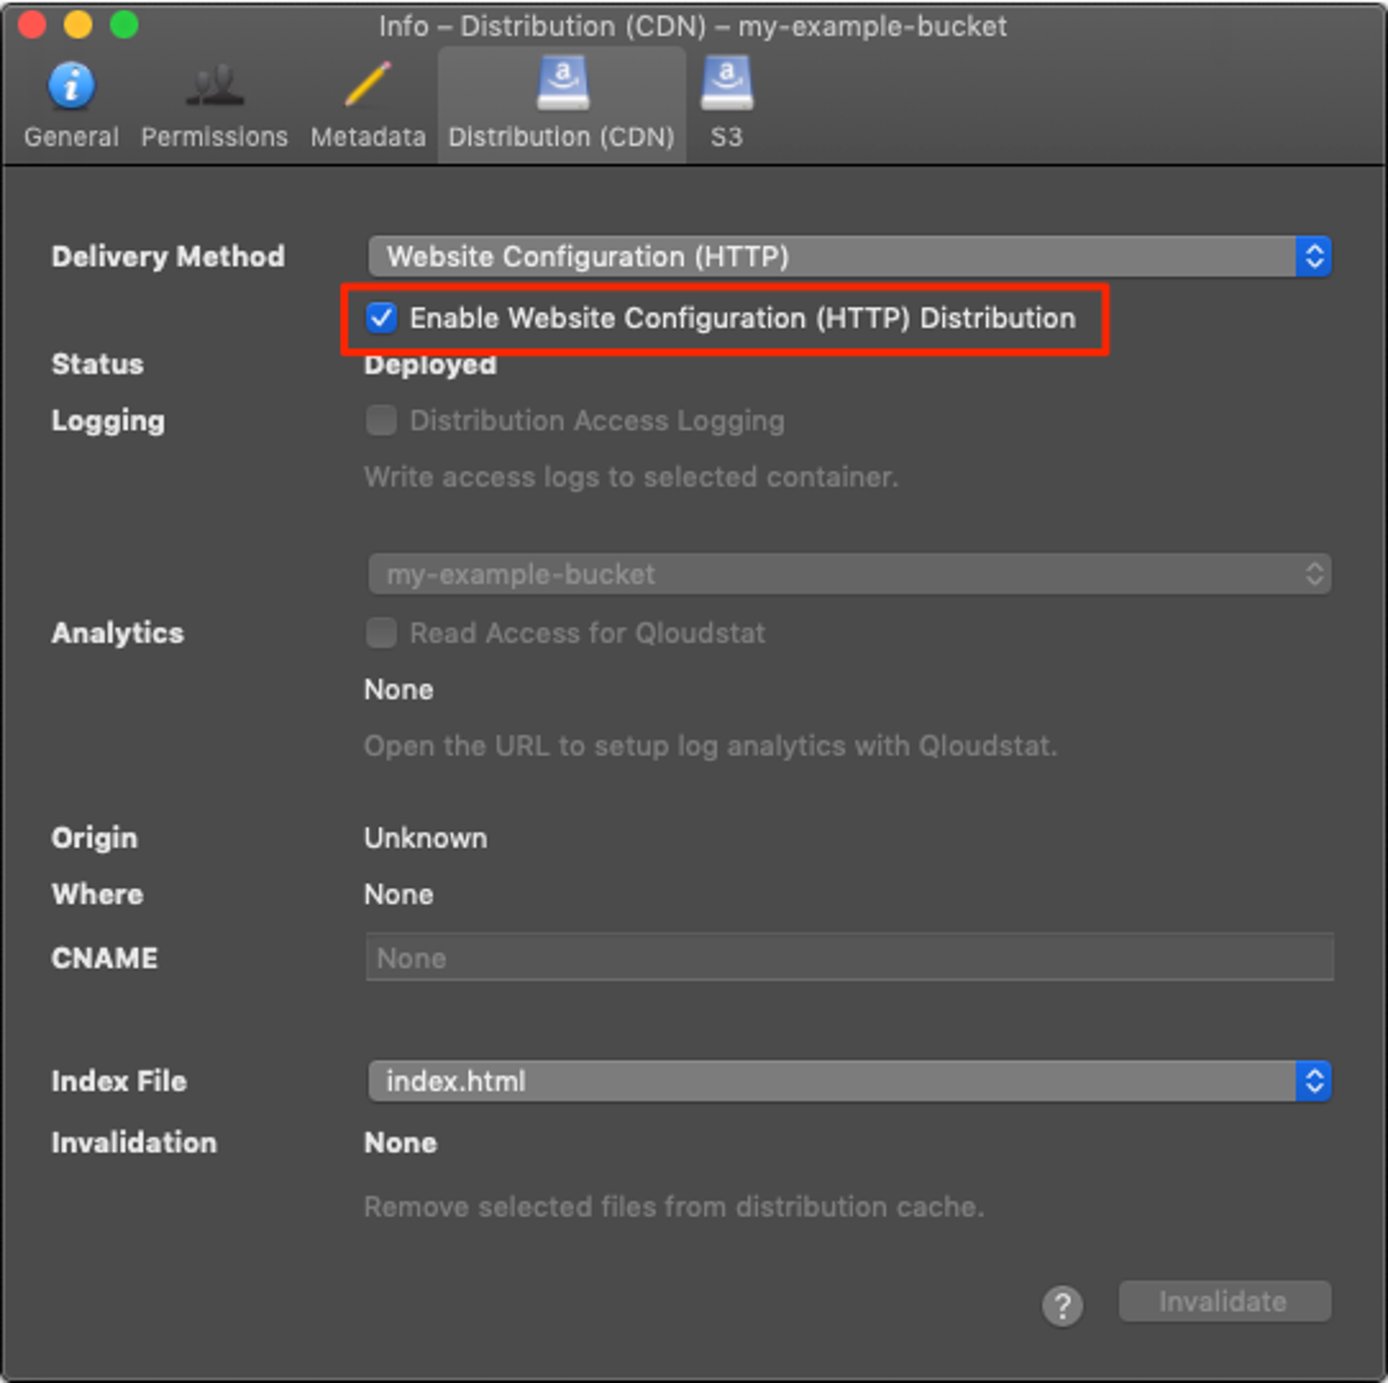
Click Info, and then select the Distribution (CDN) tab.
Check the box that reads Enable Website Configuration (HTTP) Distribution:
You need to separately upload the
index.htmland404.htmlfiles (or however you have named the index and error pages) to the bucket. Follow the instructions from the Upload, Download, and Delete an Object with Cyberduck section to upload these files.The static site is accessed from a different URL than the generic URL for the Object Storage bucket. Static sites are available at the
website-us-east-1subdomain for the Newark data center, thewebsite-eu-central-1subdomain for the Frankfurt data center, and thewebsite-ap-south-1subdomain for the Singapore data center. Usingmy-example-bucketas an example, you would navigate to either:http://my-example-bucket.website-us-east-1.linodeobjects.comorhttp://my-example-bucket.website-eu-central-1.linodeobjects.comorhttps://my-example-bucket.website-ap-south-1.linodeobjects.com
For more information on hosting a static website with Object Storage, read the Host a Static Site using Linode Object Storage guide.
Cancel Object Storage
Follow these steps to cancel the Object Storage service from the Cloud Manager:
To cancel Object Storage, you must first delete all the buckets. To delete a bucket, the bucket must be empty. For buckets that contain large amounts of objects, consider employing lifecycle policies to delete the objects.
Caution
If you have removed all of the buckets, but you have not also cancelled the Object Storage service, the account is billed at a flat rate of $5 per month (prorated) for the service. Make sure that you complete each step of this section to fully cancel the Object Storage service and to stop billing for it. For more information, see our Pricing and Limitations guide.After you’ve deleted all the buckets, navigate to the Account page in the left-hand navigation. Click the Settings tab. In the menu, you should see a setting for Object Storage:
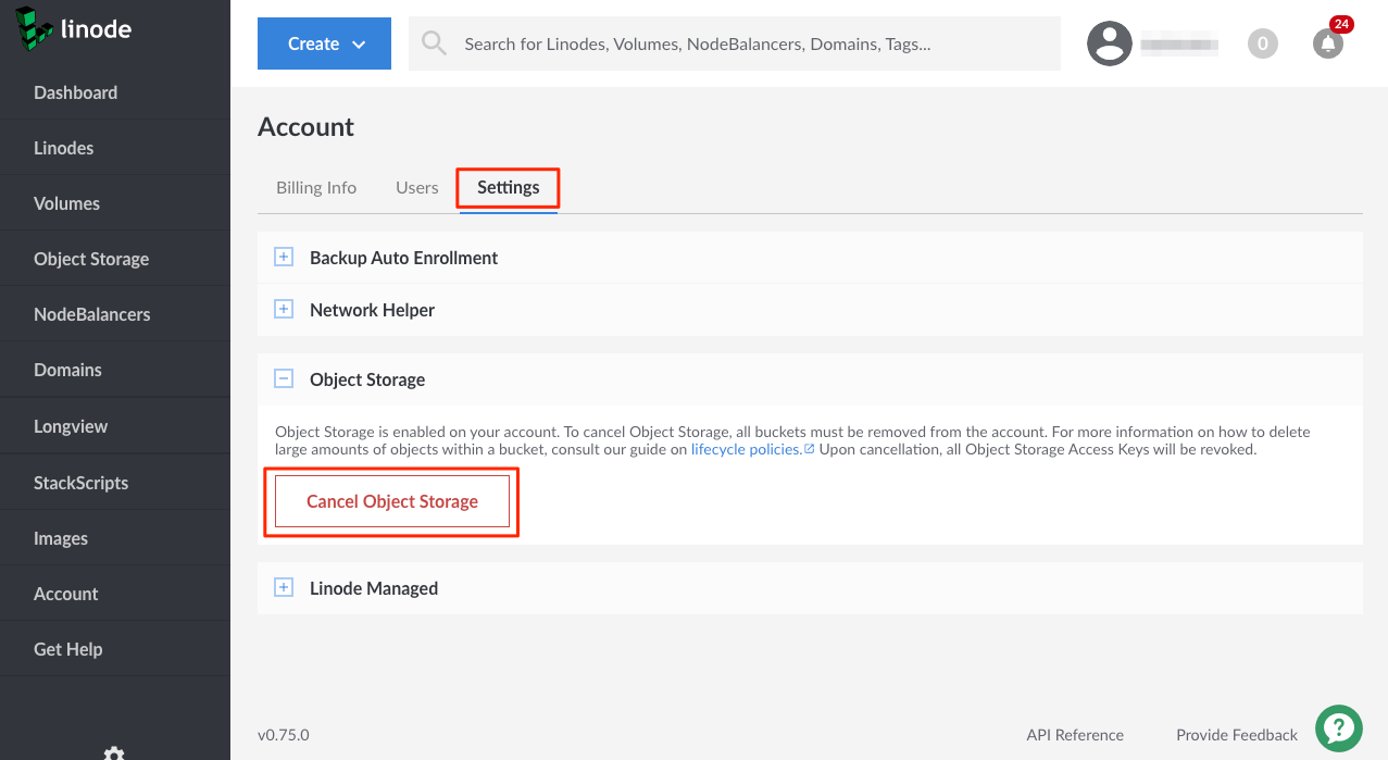
Click Cancel Object Storage. A prompt appears asking you to confirm the cancellation. If you still have active buckets, you are prompted to delete them.
Next Steps
There are S3 bindings available for a number of programming languages, including the popular Boto library for Python, that allow you to interact with Object Storage programmatically.
This page was originally published on


